Jenkins Pipeline Nomad (Integrated Vault)
Jenkins Pipeline Nomad (Integrated Vault)
Test ENV
$ sw_vers
ProductName:	macOS
ProductVersion:	12.4

$ brew --version
Homebrew 3.5.2

$ git version
git version 2.27.0

$ java -version
openjdk version "11.0.14.1" 2022-02-08

$ gradle --version
Welcome to Gradle 7.4.2!

$ docker version
Client:
 Version:           20.10.9

Server:
 Engine:
  Version:          20.10.14

$ vault version
Vault v1.11.0

$ nomad version
Nomad v1.3.1

$ curl --version
curl 7.79.1 (x86_64-apple-darwin21.0)

$ aws --version
aws-cli/2.7.11 Python/3.10.5 Darwin/21.5.0 source/x86_64 prompt/off
1. Vault & Nomad Integration (dev mode)
1.1 Vault Setup
Vault Start Dev mode
vault server -dev -dev-root-token-id=root
Vault Env
Another terminal
export VAULT_ADDR=http://127.0.0.1:8200
export VAULT_TOKEN=root
export NOMAD_POLICY=nomad-server
Vault Policy for Nomad
cat <<EOF | vault policy write $NOMAD_POLICY -
# Allow creating tokens under "nomad-cluster" token role. The token role name
# should be updated if "nomad-cluster" is not used.
path "auth/token/create/nomad-cluster" {
  capabilities = ["update"]
}

# Allow looking up "nomad-cluster" token role. The token role name should be
# updated if "nomad-cluster" is not used.
path "auth/token/roles/nomad-cluster" {
  capabilities = ["read"]
}

# Allow looking up the token passed to Nomad to validate # the token has the
# proper capabilities. This is provided by the "default" policy.
path "auth/token/lookup-self" {
  capabilities = ["read"]
}

# Allow looking up incoming tokens to validate they have permissions to access
# the tokens they are requesting. This is only required if
# `allow_unauthenticated` is set to false.
path "auth/token/lookup" {
  capabilities = ["update"]
}

# Allow revoking tokens that should no longer exist. This allows revoking
# tokens for dead tasks.
path "auth/token/revoke-accessor" {
  capabilities = ["update"]
}

# Allow checking the capabilities of our own token. This is used to validate the
# token upon startup.
path "sys/capabilities-self" {
  capabilities = ["update"]
}

# Allow our own token to be renewed.
path "auth/token/renew-self" {
  capabilities = ["update"]
}
EOF
Vault Policy for AWS
cat <<EOF | vault policy write aws_policy -
path "aws/creds/s3" {
  capabilities = ["read","update"]
}
EOF
Create Token Role
vault write auth/token/roles/nomad-cluster allowed_policies="aws_policy,db_policy" disallowed_policies="$NOMAD_POLICY" token_explicit_max_ttl=0 orphan=true token_period="259200" renewable=true
Create Token
vault token create -field token -policy $NOMAD_POLICY -period 72h -orphan > /tmp/token.txt
1.2 Nomad Setup
Nomad Start Dev mode
nomad agent -dev -vault-enabled=true -vault-address=http://127.0.0.1:8200 -vault-token=$(cat /tmp/token.txt) -vault-tls-skip-verify=true -vault-create-from-role=nomad-cluster -alloc-dir=/tmp/nomad/alloc -state-dir=/tmp/nomad/state
Nomad Env
Another terminal
export NOMAD_ADDR=http://127.0.0.1:4646
Jar file Up/Download Nexus Job
cat <<EOF | nomad job run -
job "fileserver" {
  datacenters = ["dc1"]

  group "fileserver" {
    count = 1

    network {
      port "http" {
        to = 3000
        static = 3000
      }
    }

    task "fileserver" {
      driver = "docker"

      config {
        image = "julienmeerschart/simple-file-upload-download-server"
        ports = ["http"]
      }
    }
  }
}
EOF
Upload Test
$ curl -F file=@/tmp/dynamic.properties http://localhost:3000
{"downloadLink":"http://localhost:3000/file?file=dynamic.properties","curl":"curl http://localhost:3000/file?file=dynamic.properties > dynamic.properties"}
1.3 Vault-Nomad Integration Check
$ nomad agent-info
client
  heartbeat_ttl = 11.955357358s
  known_servers = 127.0.0.1:4647
  last_heartbeat = 9.248352347s
  node_id = 69944736-5399-f805-9c03-35be83c9abfe
  num_allocations = 0
nomad
  bootstrap = true
  known_regions = 1
  leader = true
  leader_addr = 127.0.0.1:4647
  server = true
<...>
vault
  token_expire_time = 2022-06-30T08:44:26+09:00
  token_last_renewal_time = 2022-06-27T08:44:26+09:00
  token_next_renewal_time = 2022-06-28T20:44:26+09:00
  token_ttl = 71h53m46s
  tracked_for_revoked = 0
1.4 Vault Sample
AWS Dynamic Secret
Setup AWS Env
export AWS_ACCESS_KEY=AKIAU3NXXXXX
export AWS_SECRET_KEY=Rex3GPUKO3++123
export AWS_REGION=ap-northeast-2
Enable AWS Secret Engine
vault secrets enable aws
AWS Secret Engine Configuration
vault write aws/config/root \
  access_key=$AWS_ACCESS_KEY \
  secret_key=$AWS_SECRET_KEY \
  region=$AWS_REGION
AWS Secret Engine Lease change
vault write /aws/config/lease lease=1m lease_max=1m
Role setup (e.g. s3)
vault write aws/roles/s3 \
    credential_type=iam_user \
    policy_document=-<<EOF
{
  "Version": "2012-10-17",
  "Statement": [
    {
      "Effect": "Allow",
      "Action": [
     		"s3:PutObject",
      	"s3:PutObjectAcl"
      ],
      "Resource": "*"
    }
  ]
}
EOF
Test AWS Secret
$ vault read aws/creds/s3
Key                Value
---                -----
lease_id           aws/creds/s3/tt1sONqTebOsrJxBs6A3B4m4
lease_duration     1m
lease_renewable    true
access_key         AKIAU3NXDWRUL5GVEB4H
secret_key         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
security_token     <nil>
2. Jenkins Setup
2.1 Jenkins Install (macOS)
macOS guide : https://www.jenkins.io/download/lts/macos/
brew install jenkins-lts
brew services start jenkins-lts
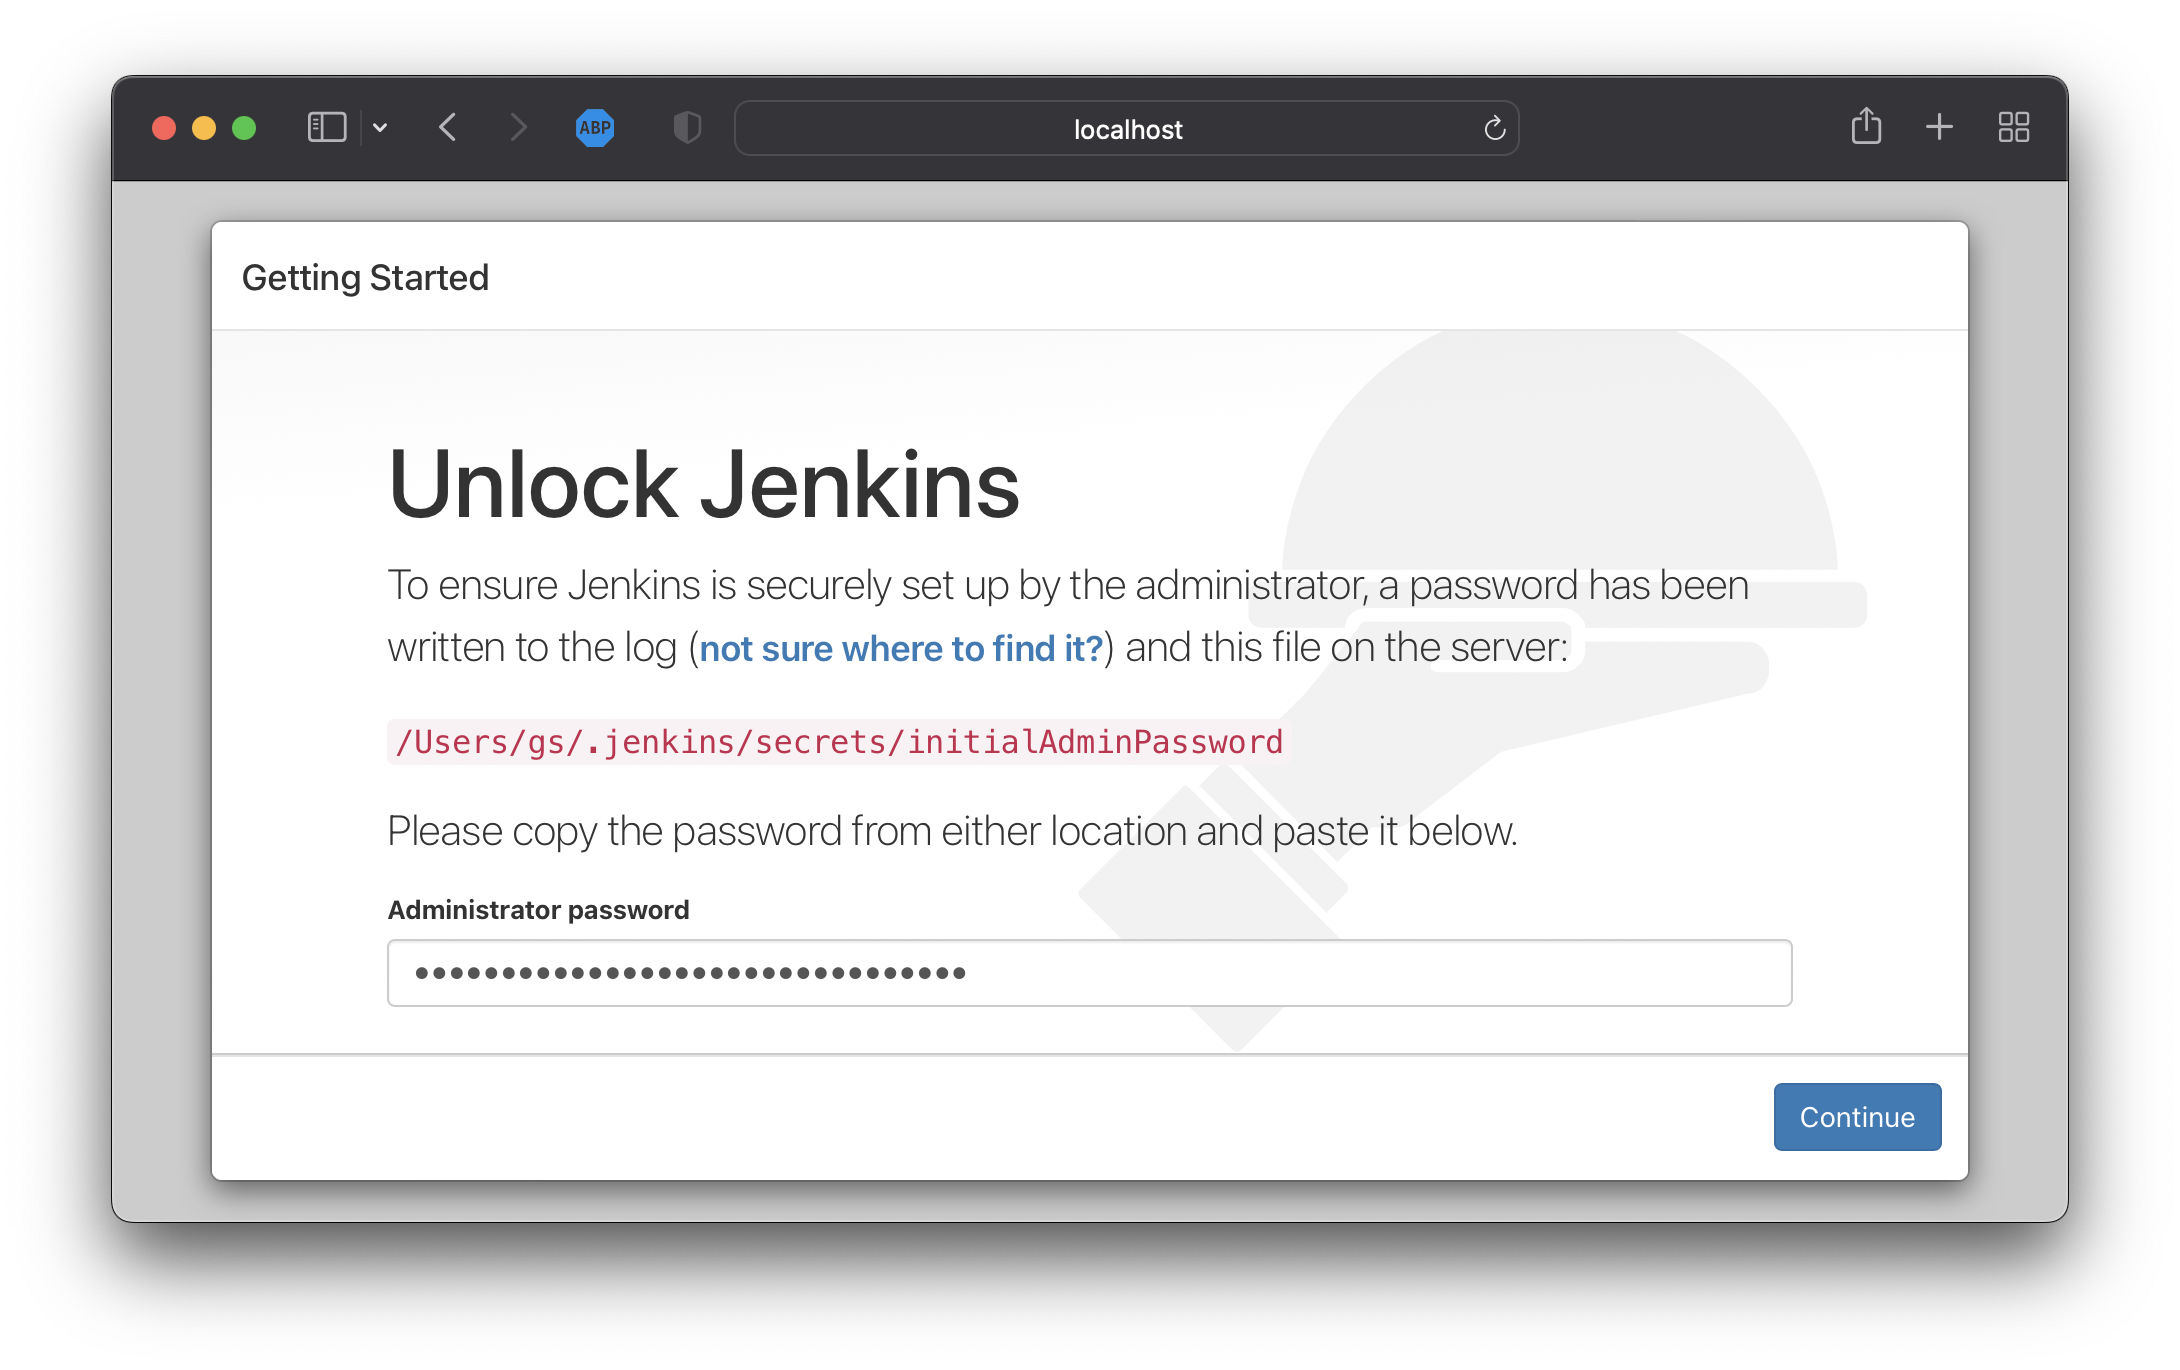
2.2 Unlock Jenkins
Home 디렉토리의 Jenkins 활성화를 위한 패스워드를 다음 경로에서 복사하여 http://localhost:8080 페이지의 Unlock Jenkins 에 입력
2.3 Jenkins Setup
Customize Jenkins
빠른 시작을 위해 기본 값인 Install suggested plugins 를 클릭
Create First Admin User
계정명, 암호, 이름, 이메일 주소를 기입하고 Save and Continue 버튼 클릭
Instance Configuration
올바른 Jenkins URL을 확인하고 Save and Finish 버튼 클릭
Jenkins is ready!
Start using Jenkins 버튼 클릭
2.4 Jenkins github plugin
GitHub
GitHub 로그인
우측 상단 사용자 메뉴 클릭 후
Settings클릭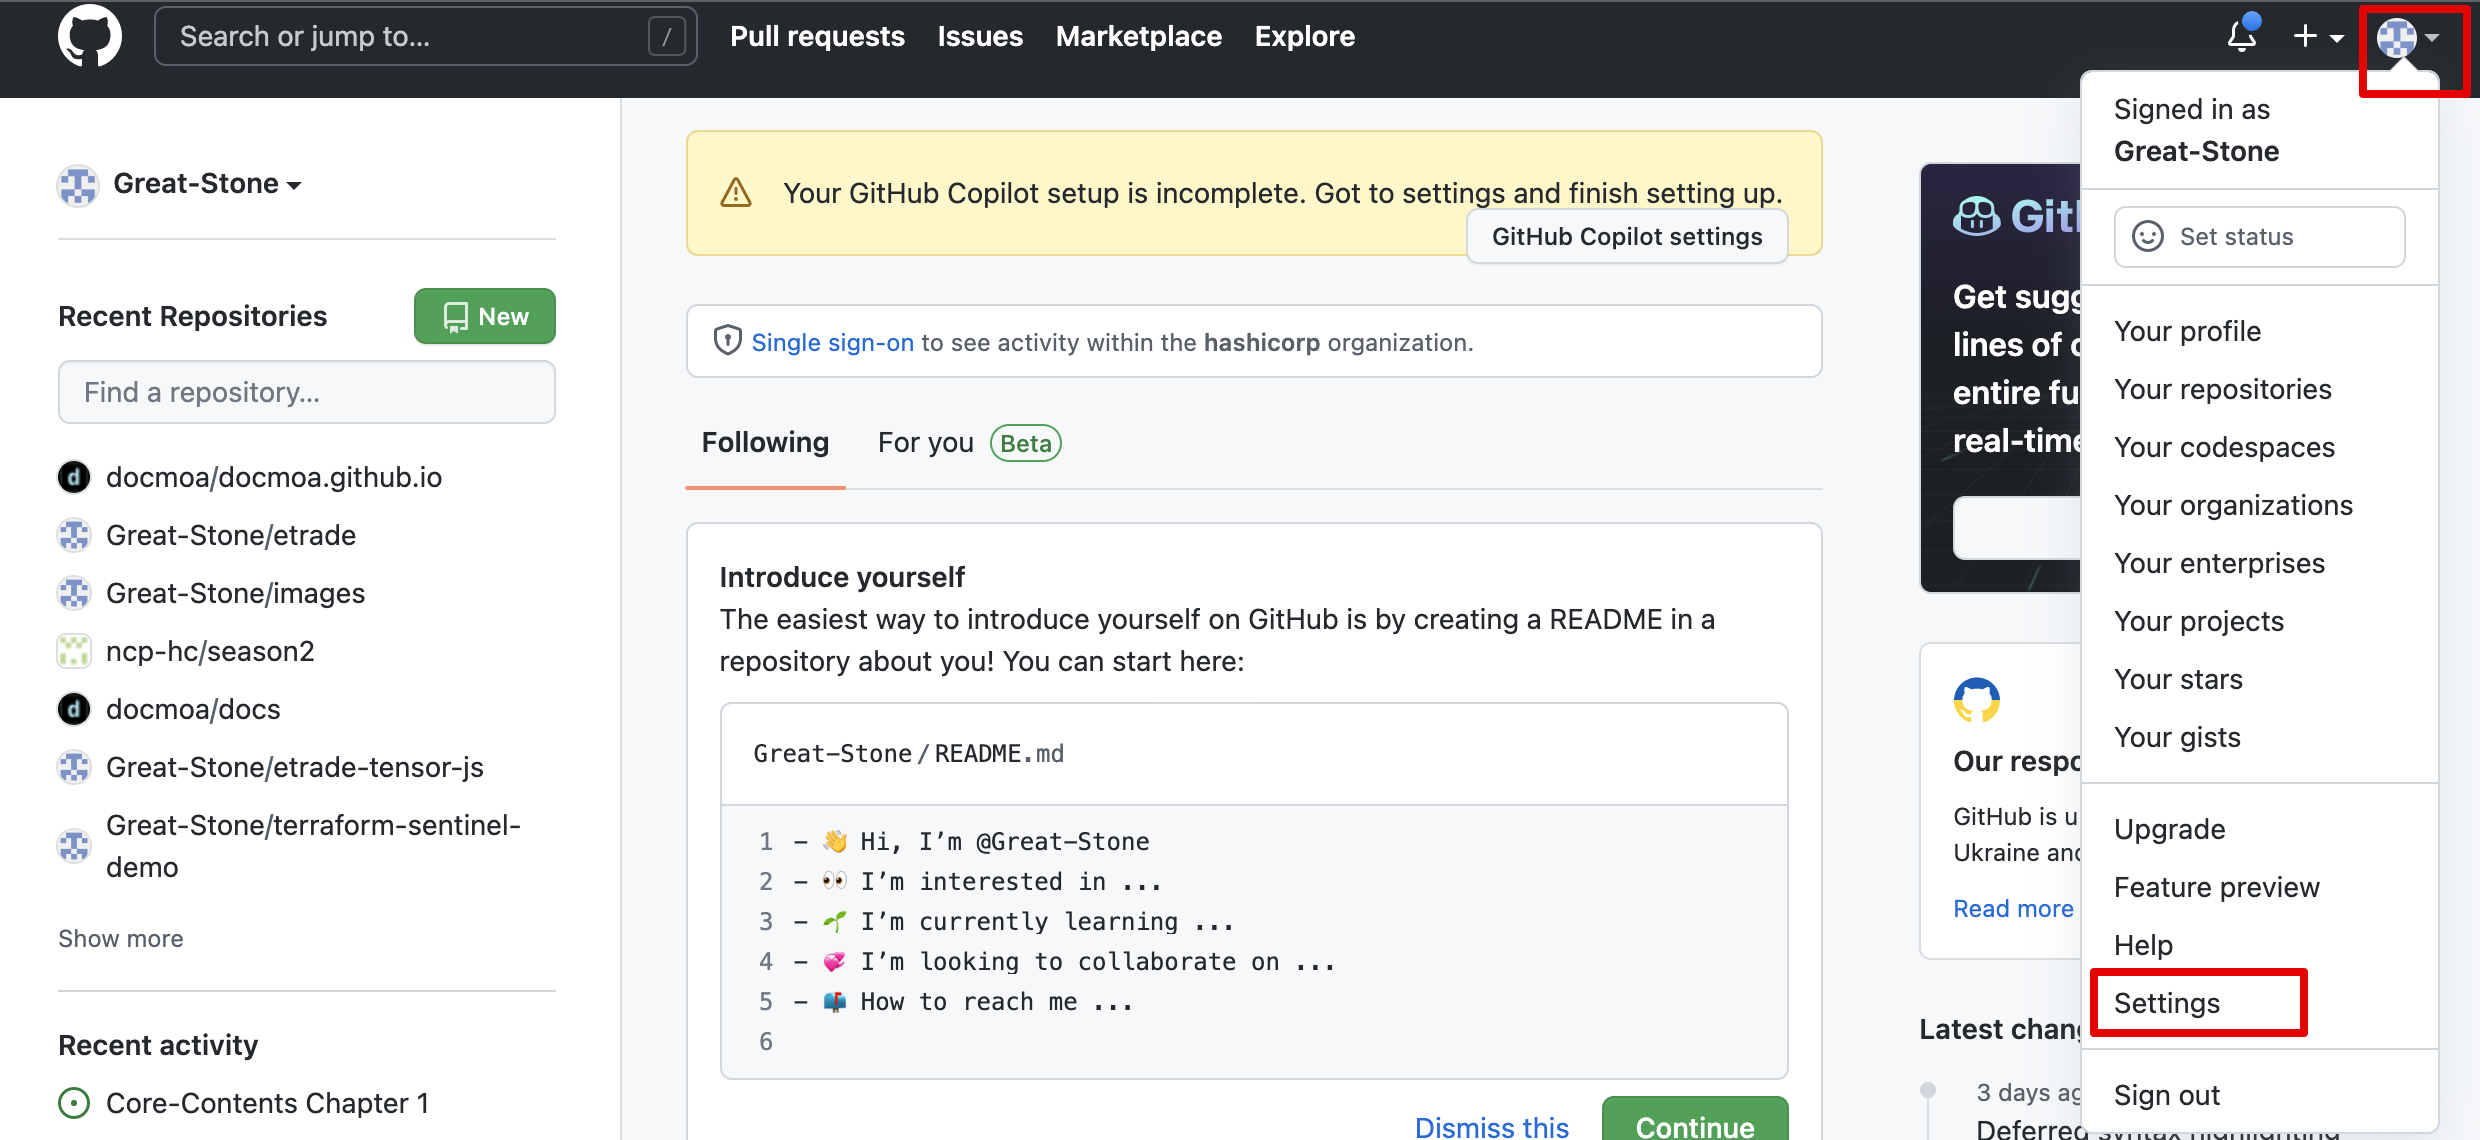
GitHub 2022-06-27 12-36-30 좌측 메뉴 최하단
Developer settings클릭좌측 메뉴
Personal access tokens클릭Generate new token버튼 클릭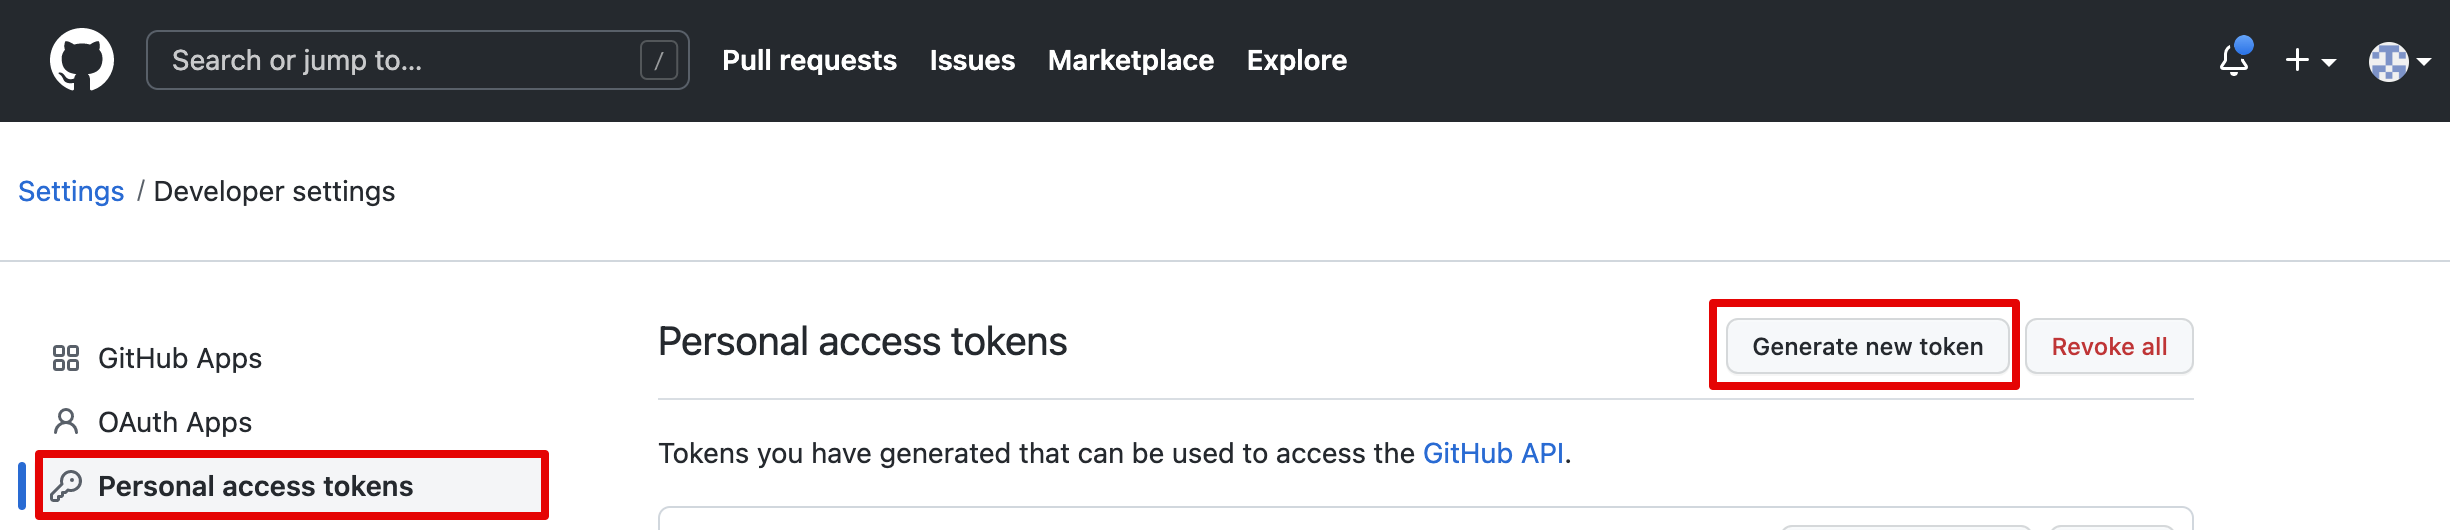
Personal access tokens Token 옵션 선택 후
Generate token클릭- Note : 토큰 목적 입력 (e.g. Jenkins Token)
- Expiration : 기간을 설정 (e.g. No expiration)
- Select scopes
- repo
- admin:org
- admin:repo_hook
생성된 토큰을 기록/보관
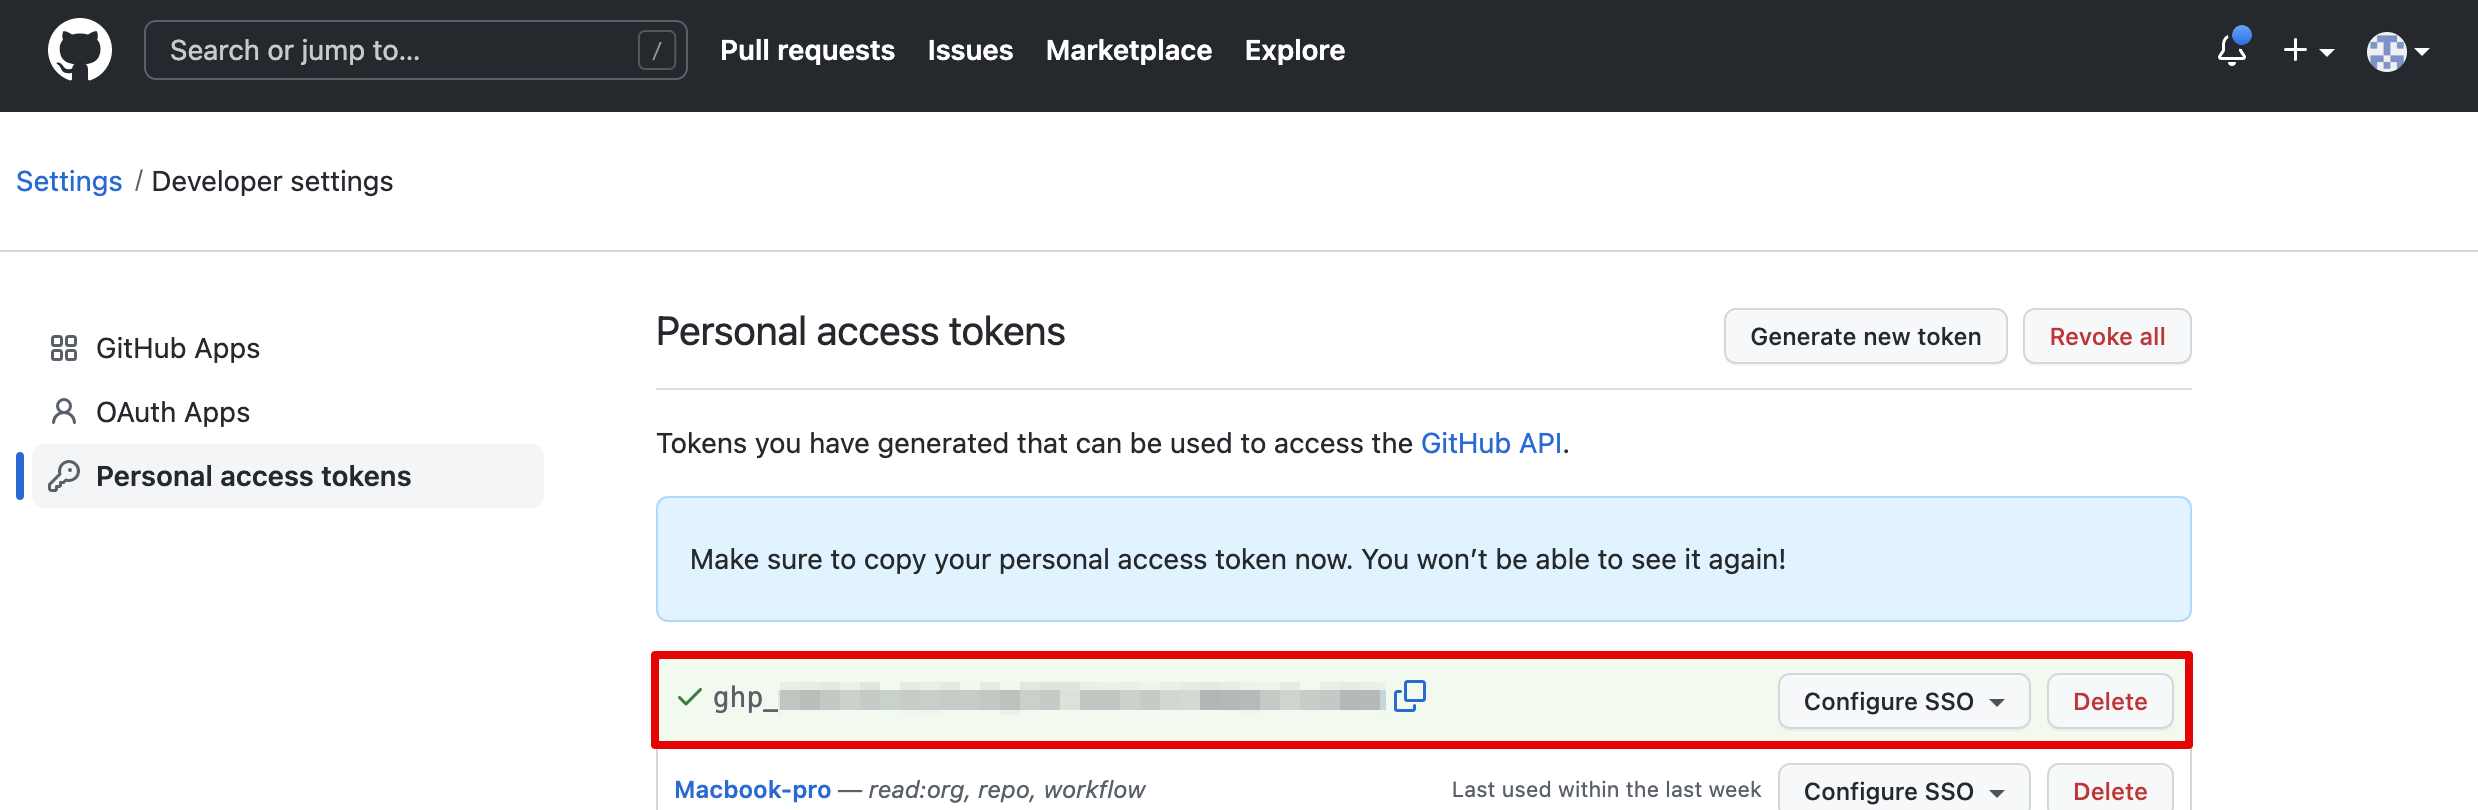
Personal access tokens 2022-06-27 12-42-58
Jenkins
Jenkins 관리>시스템 설정으로 이동JDK항목에서Add JDK클릭- Name : 이름 입력 (e.g. jdk11)
- JAVA_HOME : 자바 홈 경로 (e.g. /Library/Java/JavaVirtualMachines/temurin-11.jdk/Contents/Home)
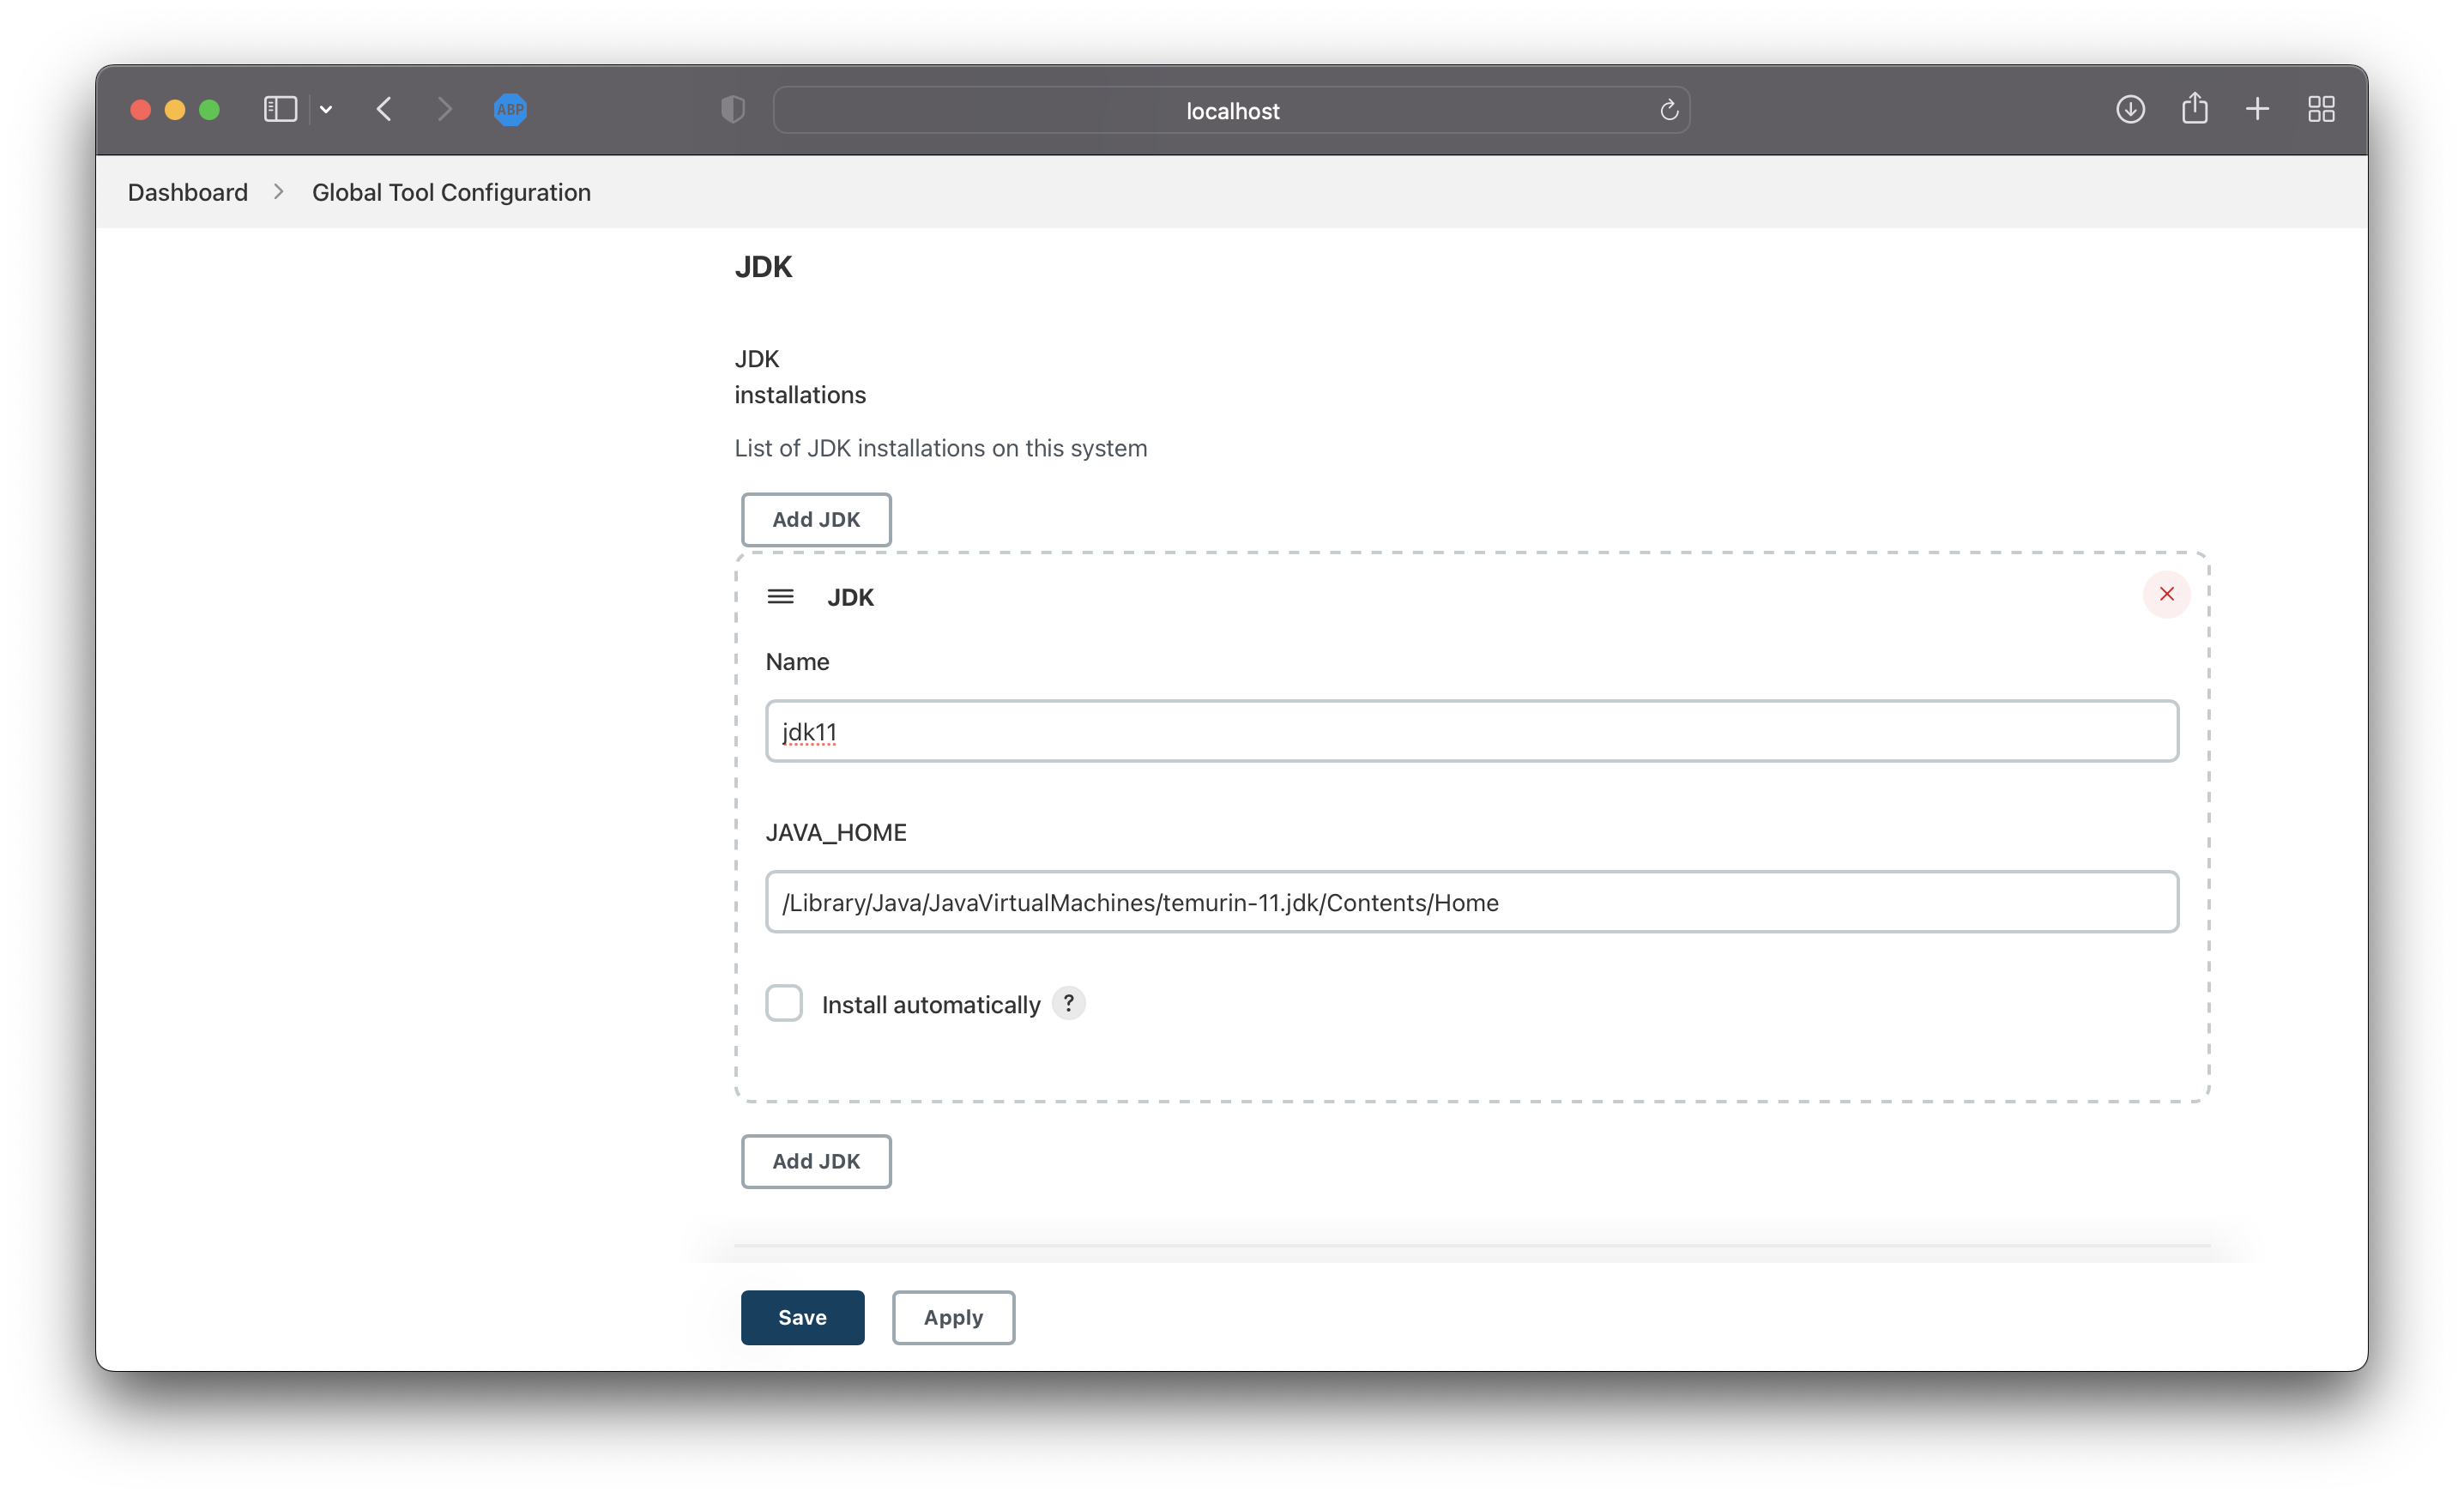
image-20220627143641019 Git항목에서Add Git을 클릭- Name : 이름 입력 (e.g. local)
- Path to Git executable : git 실행파일 경로 입력 (e.g. /usr/local/bin/git)
GitHub항목에서Add GitHub Server드롭박스의GitHub Server를 클릭- Name : 이름 입력 (e.g. jenkins_github)
- API URL : 기본 값 (https://api.github.com)
- Credentials : 아래
+Add버튼 클릭하여Jenkins선택 후 새로운 크리덴셜 생성 후 생성된 항목 지정 - Kind :
Secret Test선택 - Secret : GitHub에서 생성한 토큰 입력
- ID : 사용자 지정 (e.g. jenkins_github)
Test Connection버튼으로 연결 확인

스크린샷 2022-06-27 12.48.18 Gradle항목에서Add Gradle클릭Name : 이름 입력 (e.g. gradle)
GRADLE_HOME : Gradle 홈 디렉토리 입력 (e.g. /usr/local/Cellar/gradle/7.4.2/libexec)
3. Sample Java
3.1 App Setting
Spring-boot Initializr
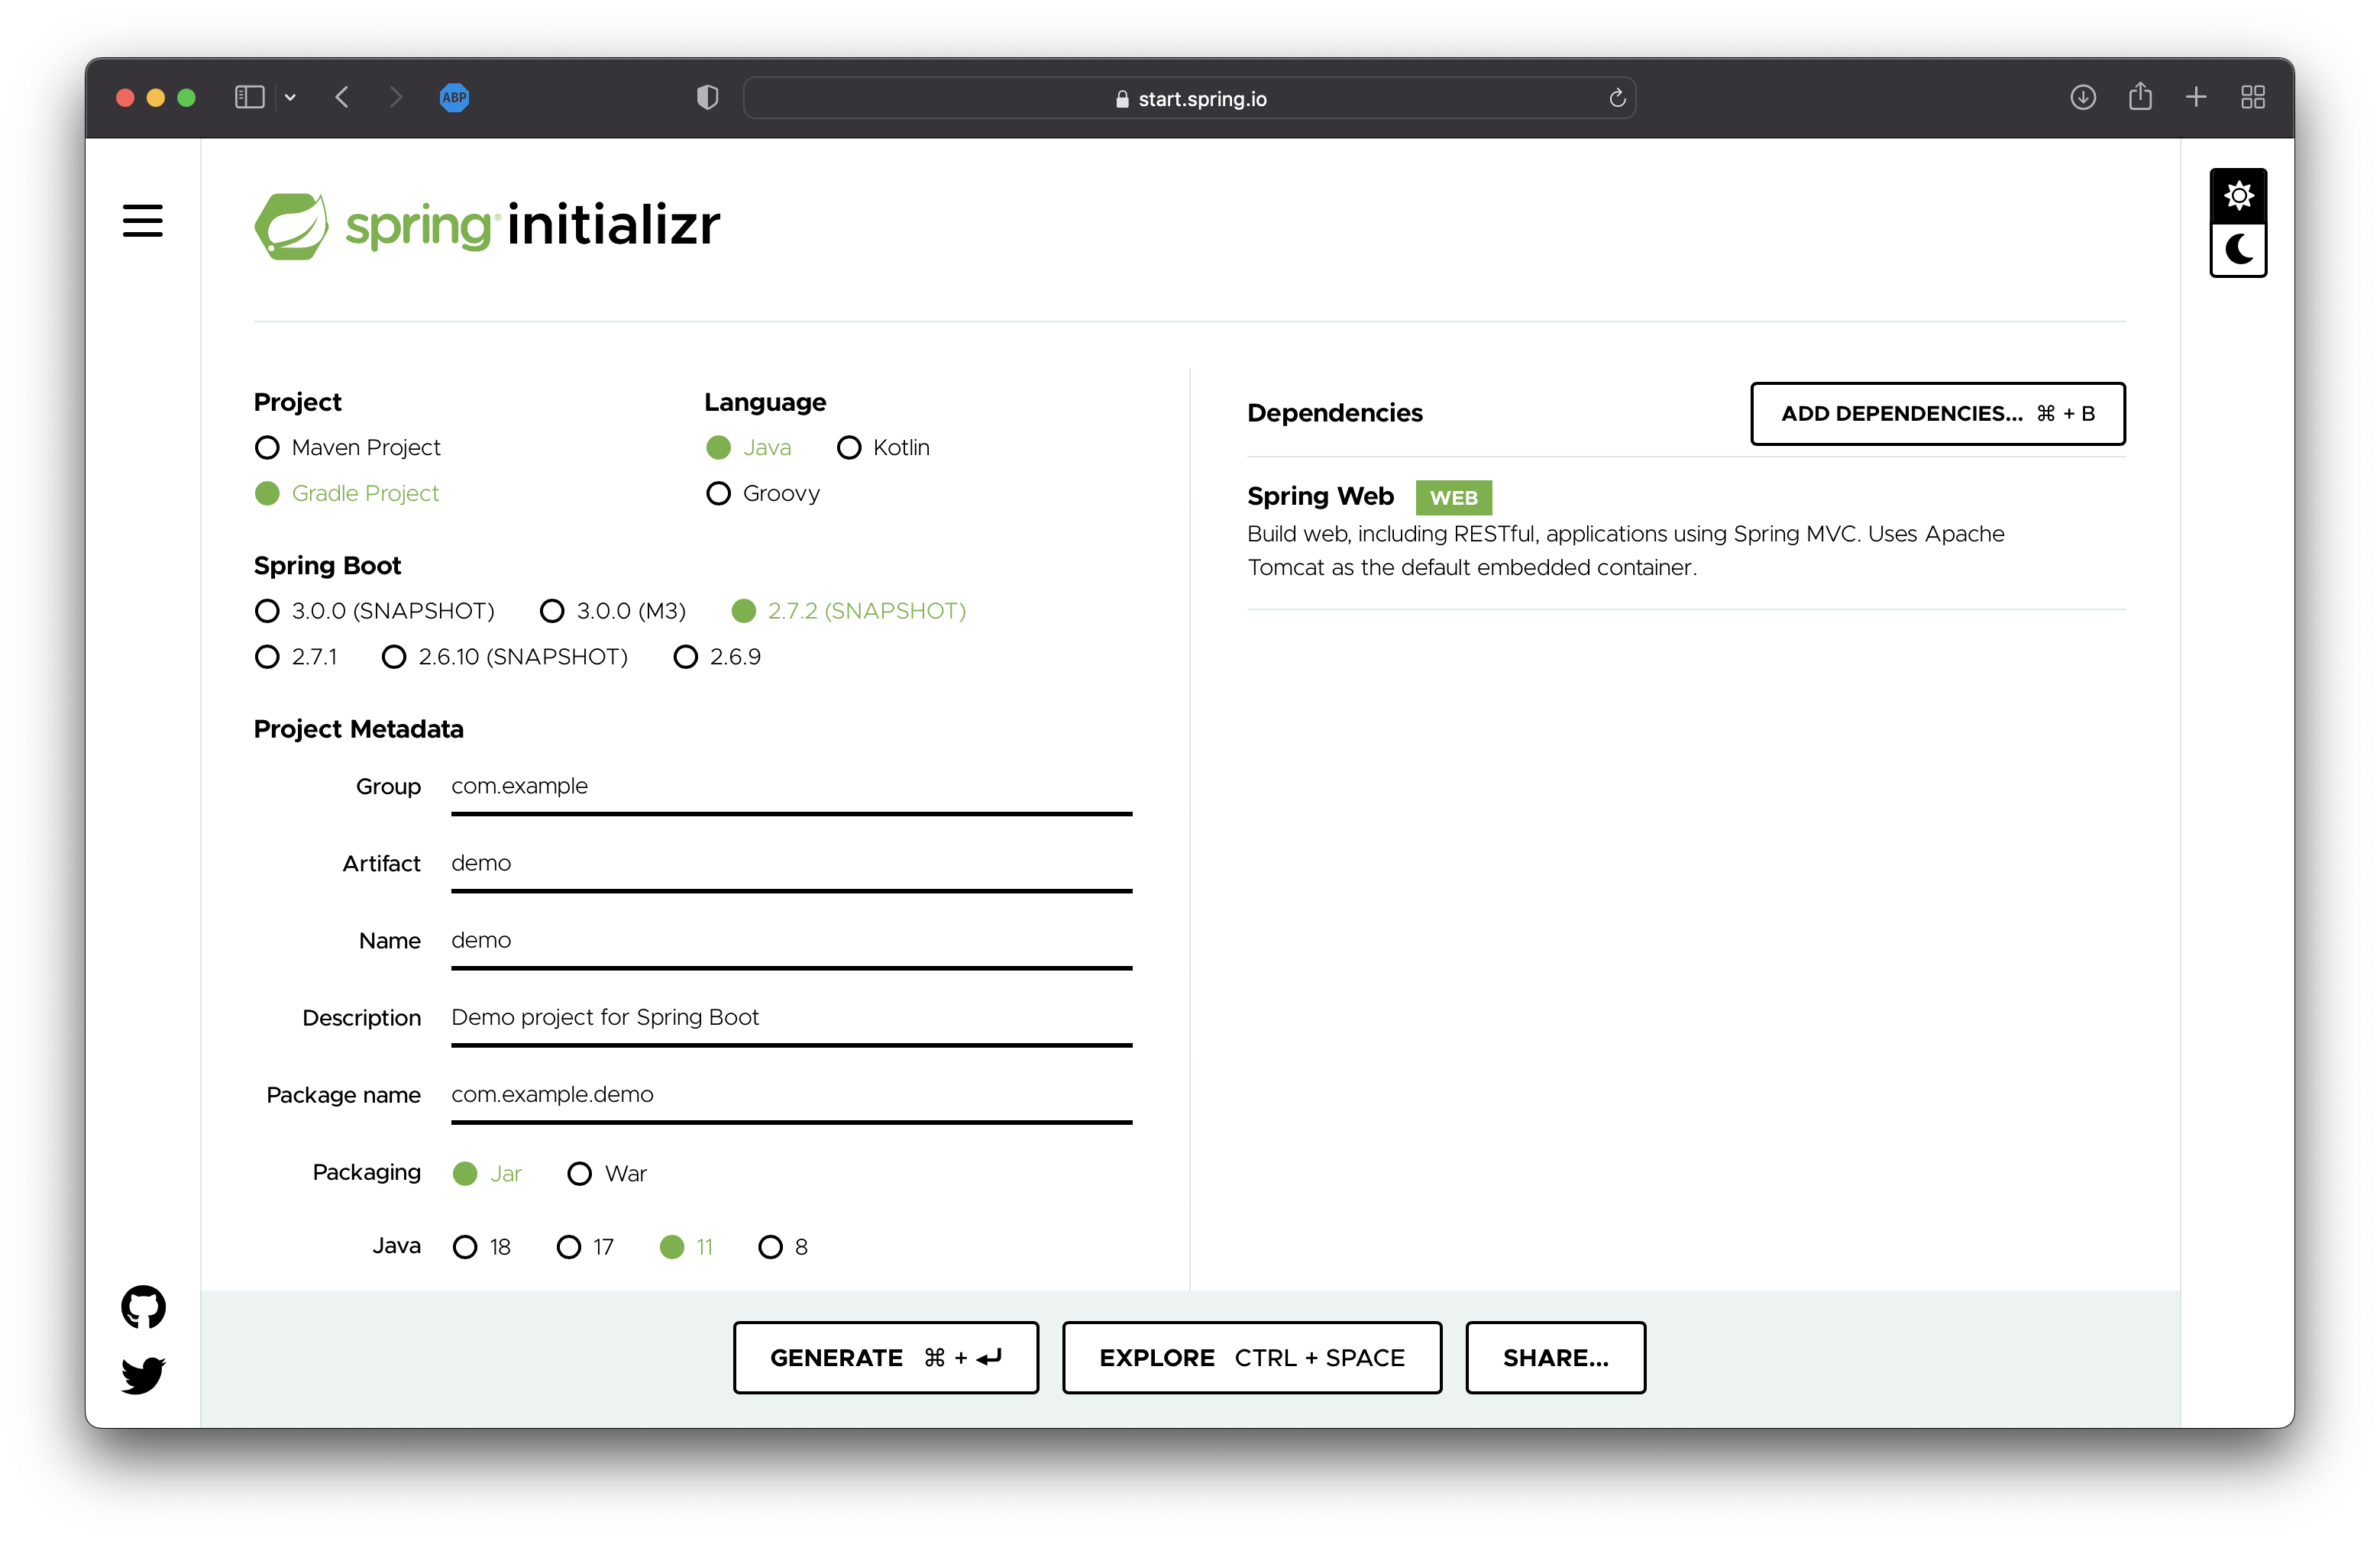
- Project : Gradle Project
- Language : Java
- Spring Boot : 2.7.2
- Packageing : Jar
- Java : 11
- Dependencies : Spring Web
App Setup
demo>src>main>resources>application.yml
dynamic:
  path: ${DYNAMIC_PROPERTIES_PATH:/tmp/dynamic.properties}
server:
  port: ${NOMAD_HOST_PORT_http:8080}
demo>src>main>java>com>example>demo>DemoApplication.java
package com.example.demo;

import org.springframework.beans.factory.annotation.Value;
import org.springframework.boot.SpringApplication;
import org.springframework.boot.autoconfigure.SpringBootApplication;
import org.springframework.scheduling.annotation.EnableScheduling;
import org.springframework.scheduling.annotation.Scheduled;
import org.springframework.web.bind.annotation.RequestMapping;
import org.springframework.web.bind.annotation.RequestMethod;
import org.springframework.web.bind.annotation.RestController;
import java.io.IOException;
import java.nio.file.Files;
import java.nio.file.Paths;
import java.util.List;

@RestController
@SpringBootApplication
@EnableScheduling
public class DemoApplication {

	private static String FILE_PATH;

	@Value("${dynamic.path}")
	public void setKey(String value) {
		FILE_PATH = value;
	}

	public static void main(String[] args) {
		SpringApplication.run(DemoApplication.class, args);
	}

	@Scheduled(fixedRate=1000)
	public void filecheck() throws IOException {
		List<String> str = Files.readAllLines(Paths.get(FILE_PATH));
		System.out.println(str);
	}

	@RequestMapping(method = RequestMethod.GET, path = "/")
	public String index() throws IOException {
		List<String> str = Files.readAllLines(Paths.get(FILE_PATH));
		System.out.println(str);

		return "<h1>AWS</h1>"
		.concat("<h2>" + str.get(0) + "</h2>")
		.concat("<h2>" + str.get(1) + "</h2>");
	}
}
Set dummy properties & Test
cat <<EOF> /tmp/dynamic.properties
aws_access_key=my_access_key
aws_secret_key=my_secret_key
EOF
$ gradle bootRun
...
[aws_access_key=my_access_key, aws_secret_key=my_secret_key]
[aws_access_key=my_access_key, aws_secret_key=my_secret_key]
<==========---> 80% EXECUTING [5s]
> :bootRun
4. Pipeline 생성
Pipeline 구성 case 1
- GitHub checkout
- Gradle build
- jar upload
- Nomad Job Start
Pipeline 구성 case 2
- GitHub checkout
- Gradle build
- docker build
- docker push
- Nomad Job Start
4.1 Jenkins Job - Jar
좌측
+ 새로운 Item버튼 클릭이름 입력 (e.g. Nomad Job - Java Driver)
Pipeline 선택 후
OK성성된 Jenkins Job의 Pipeline에 스크립트 구성
pipeline {
    agent any
    triggers {
        cron('H */8 * * *') //regular builds
        pollSCM('* * * * *') //polling for changes, here once a minute
    }
    tools {
        git('local')
        gradle('gradle')
        jdk("jdk11")
    }
    environment {
        NOMAD_ADDR = 'http://localhost:4646'
    }
    stages {
        stage('Clone') {
            steps {
                git branch: 'main',
                    credentialsId: 'jenkins_github',
                    url: 'https://github.com/Great-Stone/jenkins-gradle-nomad-pipeline'
                sh "ls -lat"
            }
        }
        stage('Test') {
            steps {
                sh './gradlew test'
            }
        }
        stage('Build') {
            steps {
                sh './gradlew build'
            }
        }
        stage('Upload') {
            steps {
                sh 'mv ./build/libs/demo-0.0.1-SNAPSHOT.jar ./demo-${BUILD_NUMBER}.jar'
                sh 'curl -F file=@./demo-${BUILD_NUMBER}.jar http://localhost:3000'
            }
        }
        stage('Nomad Download') {
            steps {
                sh 'curl -C - --output nomad_1.3.1_darwin_amd64.zip https://releases.hashicorp.com/nomad/1.3.1/nomad_1.3.1_darwin_amd64.zip'
                sh 'unzip -o nomad_1.3.1_darwin_amd64.zip'
            }
        }
        stage('Deploy To Nomad') {
            input{
                message "Do you want to proceed for production deployment?"
            }
            steps {
                sh './nomad job run -var version=${BUILD_NUMBER} ./nomad-java.hcl'
            }
        }
    }
}
지금 빌드를 클릭하여 빌드를 진행합니다. 마지막 단계에서 마우스 오버하여 승인처리합니다.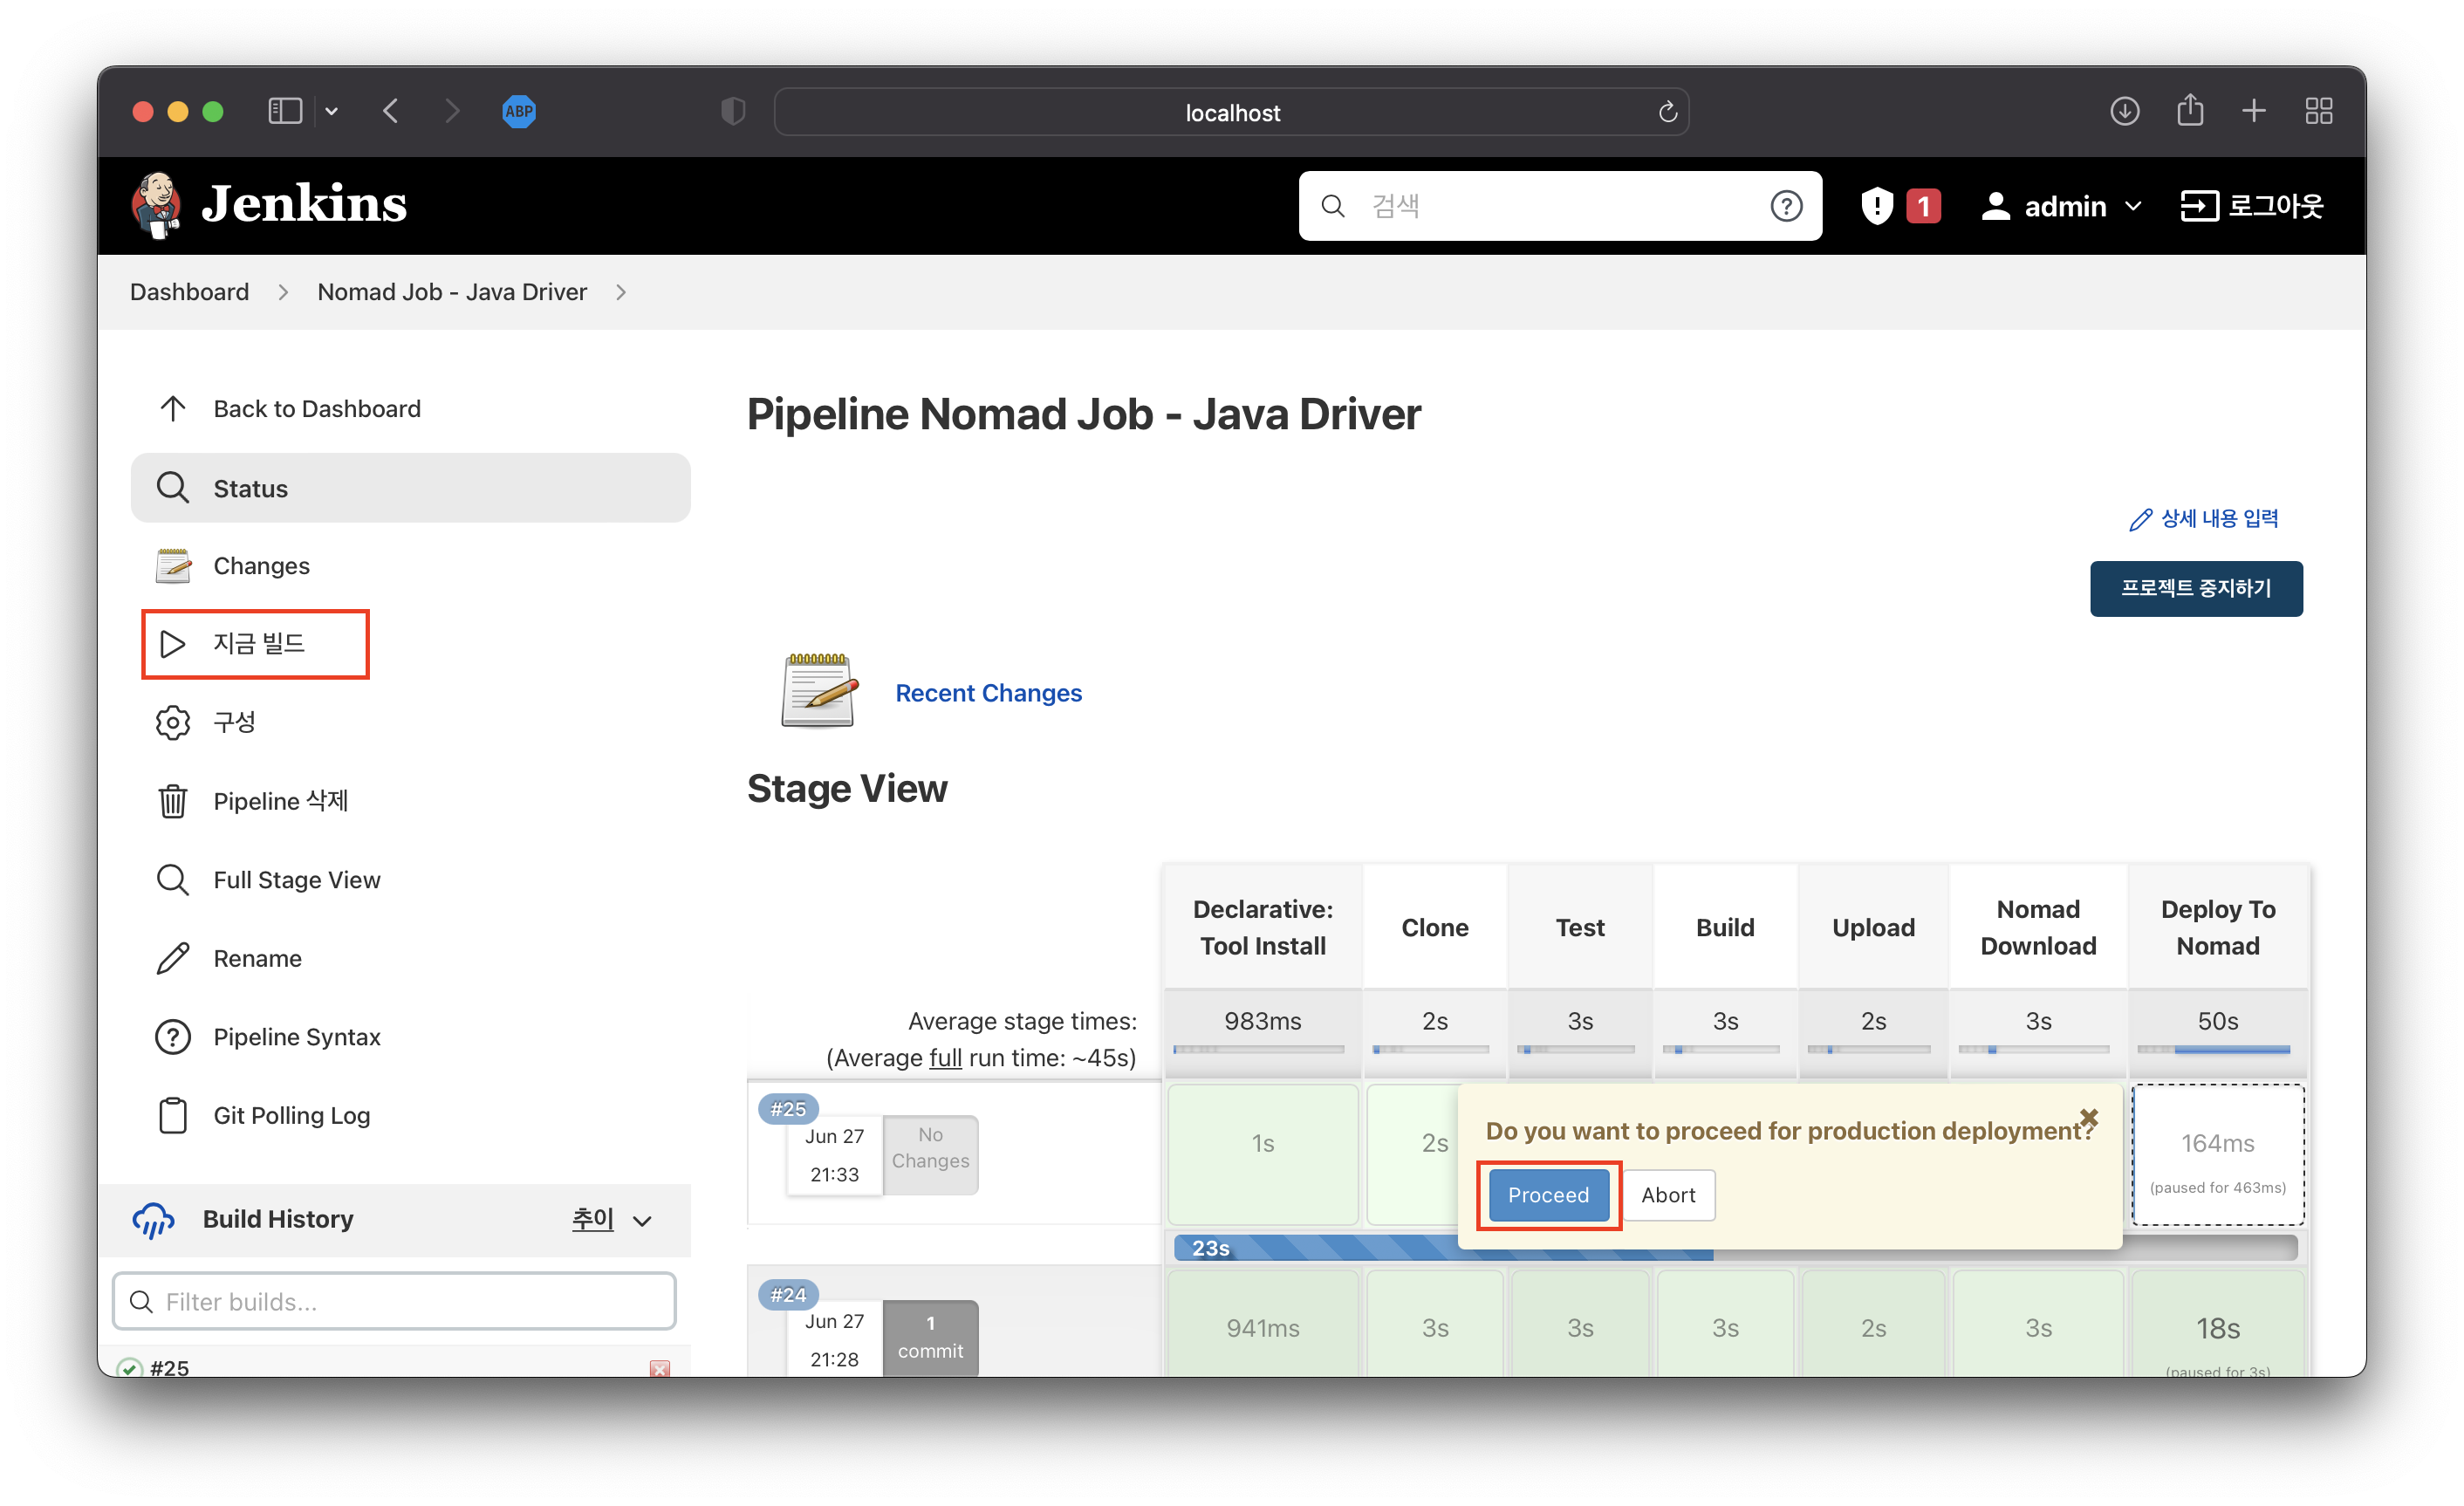
image-20220627213452717 
스크린샷 2022-06-27 21.35.35
4.2 Jenkins Job - Docker / ECR
ECR - AWS 구성 필요
- AWS 로그인 후 ECR 서비스로 이동한 후 우측의 리포지토리 생성
- Private 으로 생성하는 경우 AWS Credential 설정을 Jenkins에 추가
리포지토리 이름을 입력 후 태그 변경 불가능 옵션과 푸시할 때 스캔 설정
리포지토리 생성 후 URI 복사
e.g. <id>.dkr.ecr.ap-northeast-2.amazonaws.com/demo
Plugin Setup
Jenkins 관리>플러그인 관리로 이동설치 가능탭을 선택하고AWS Global Configuration,Docker,Docker Pipeline,Amazon ECR를 검색 후 설치
image-20220627220001821 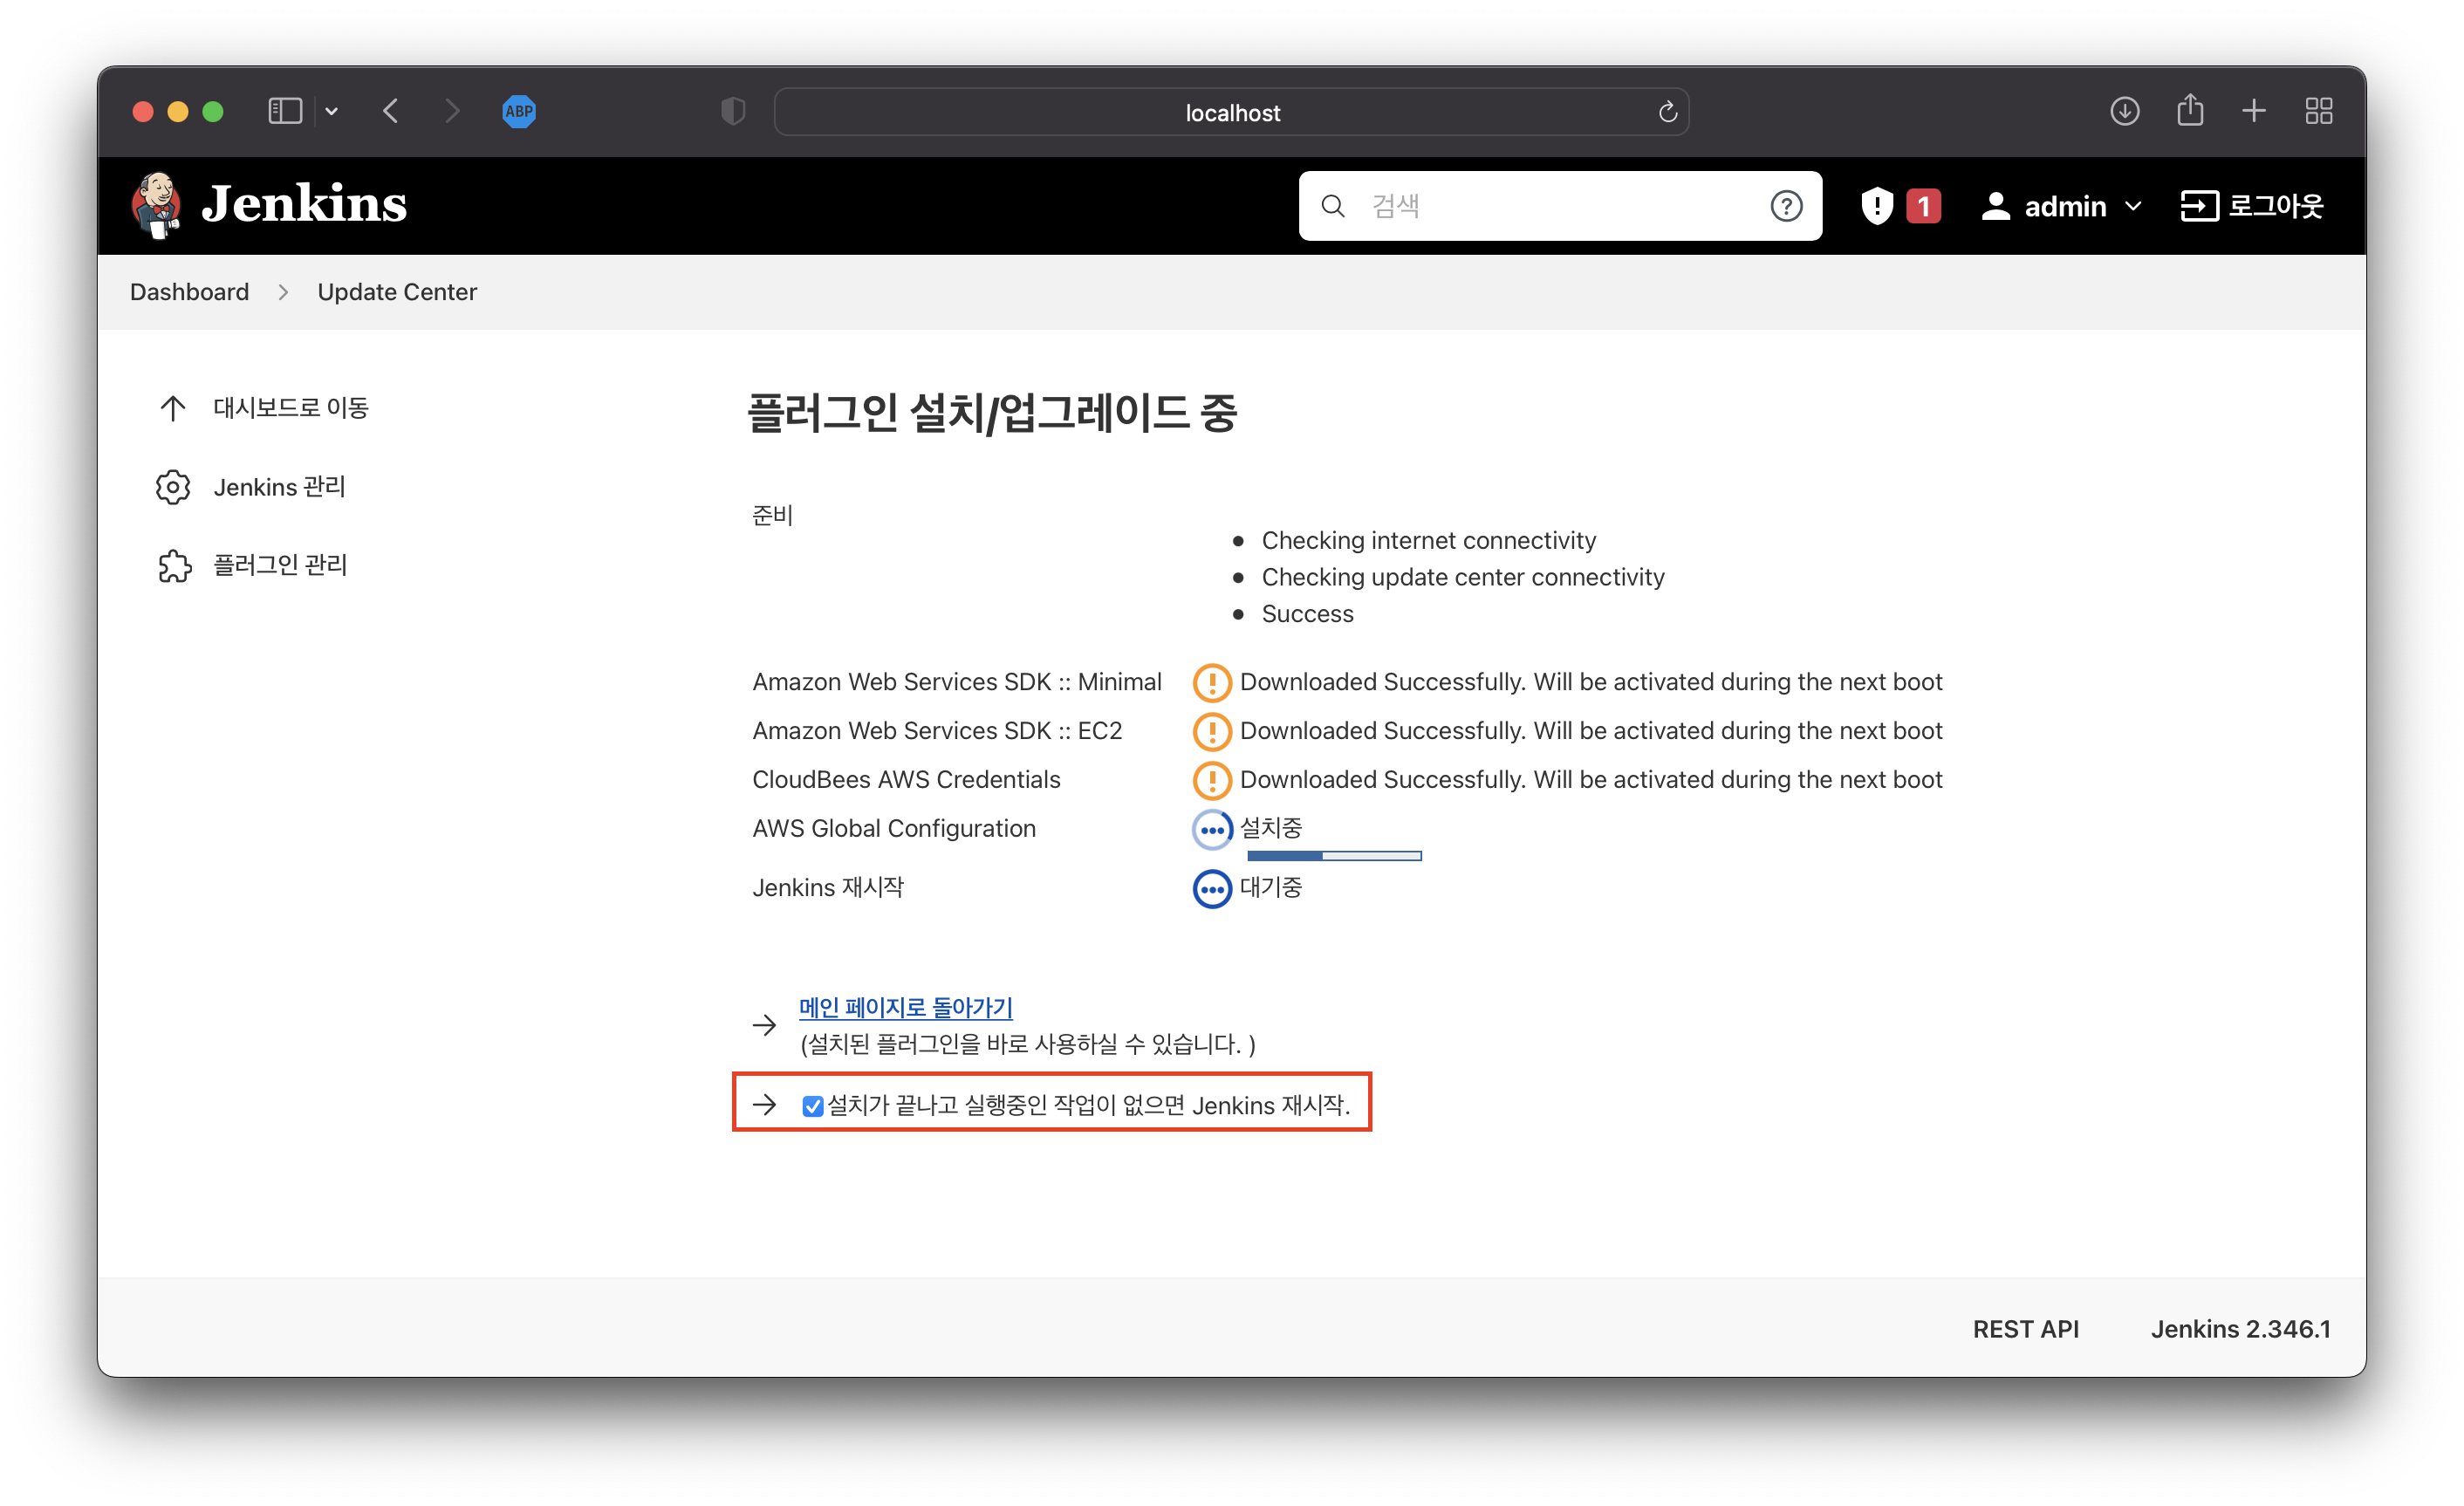
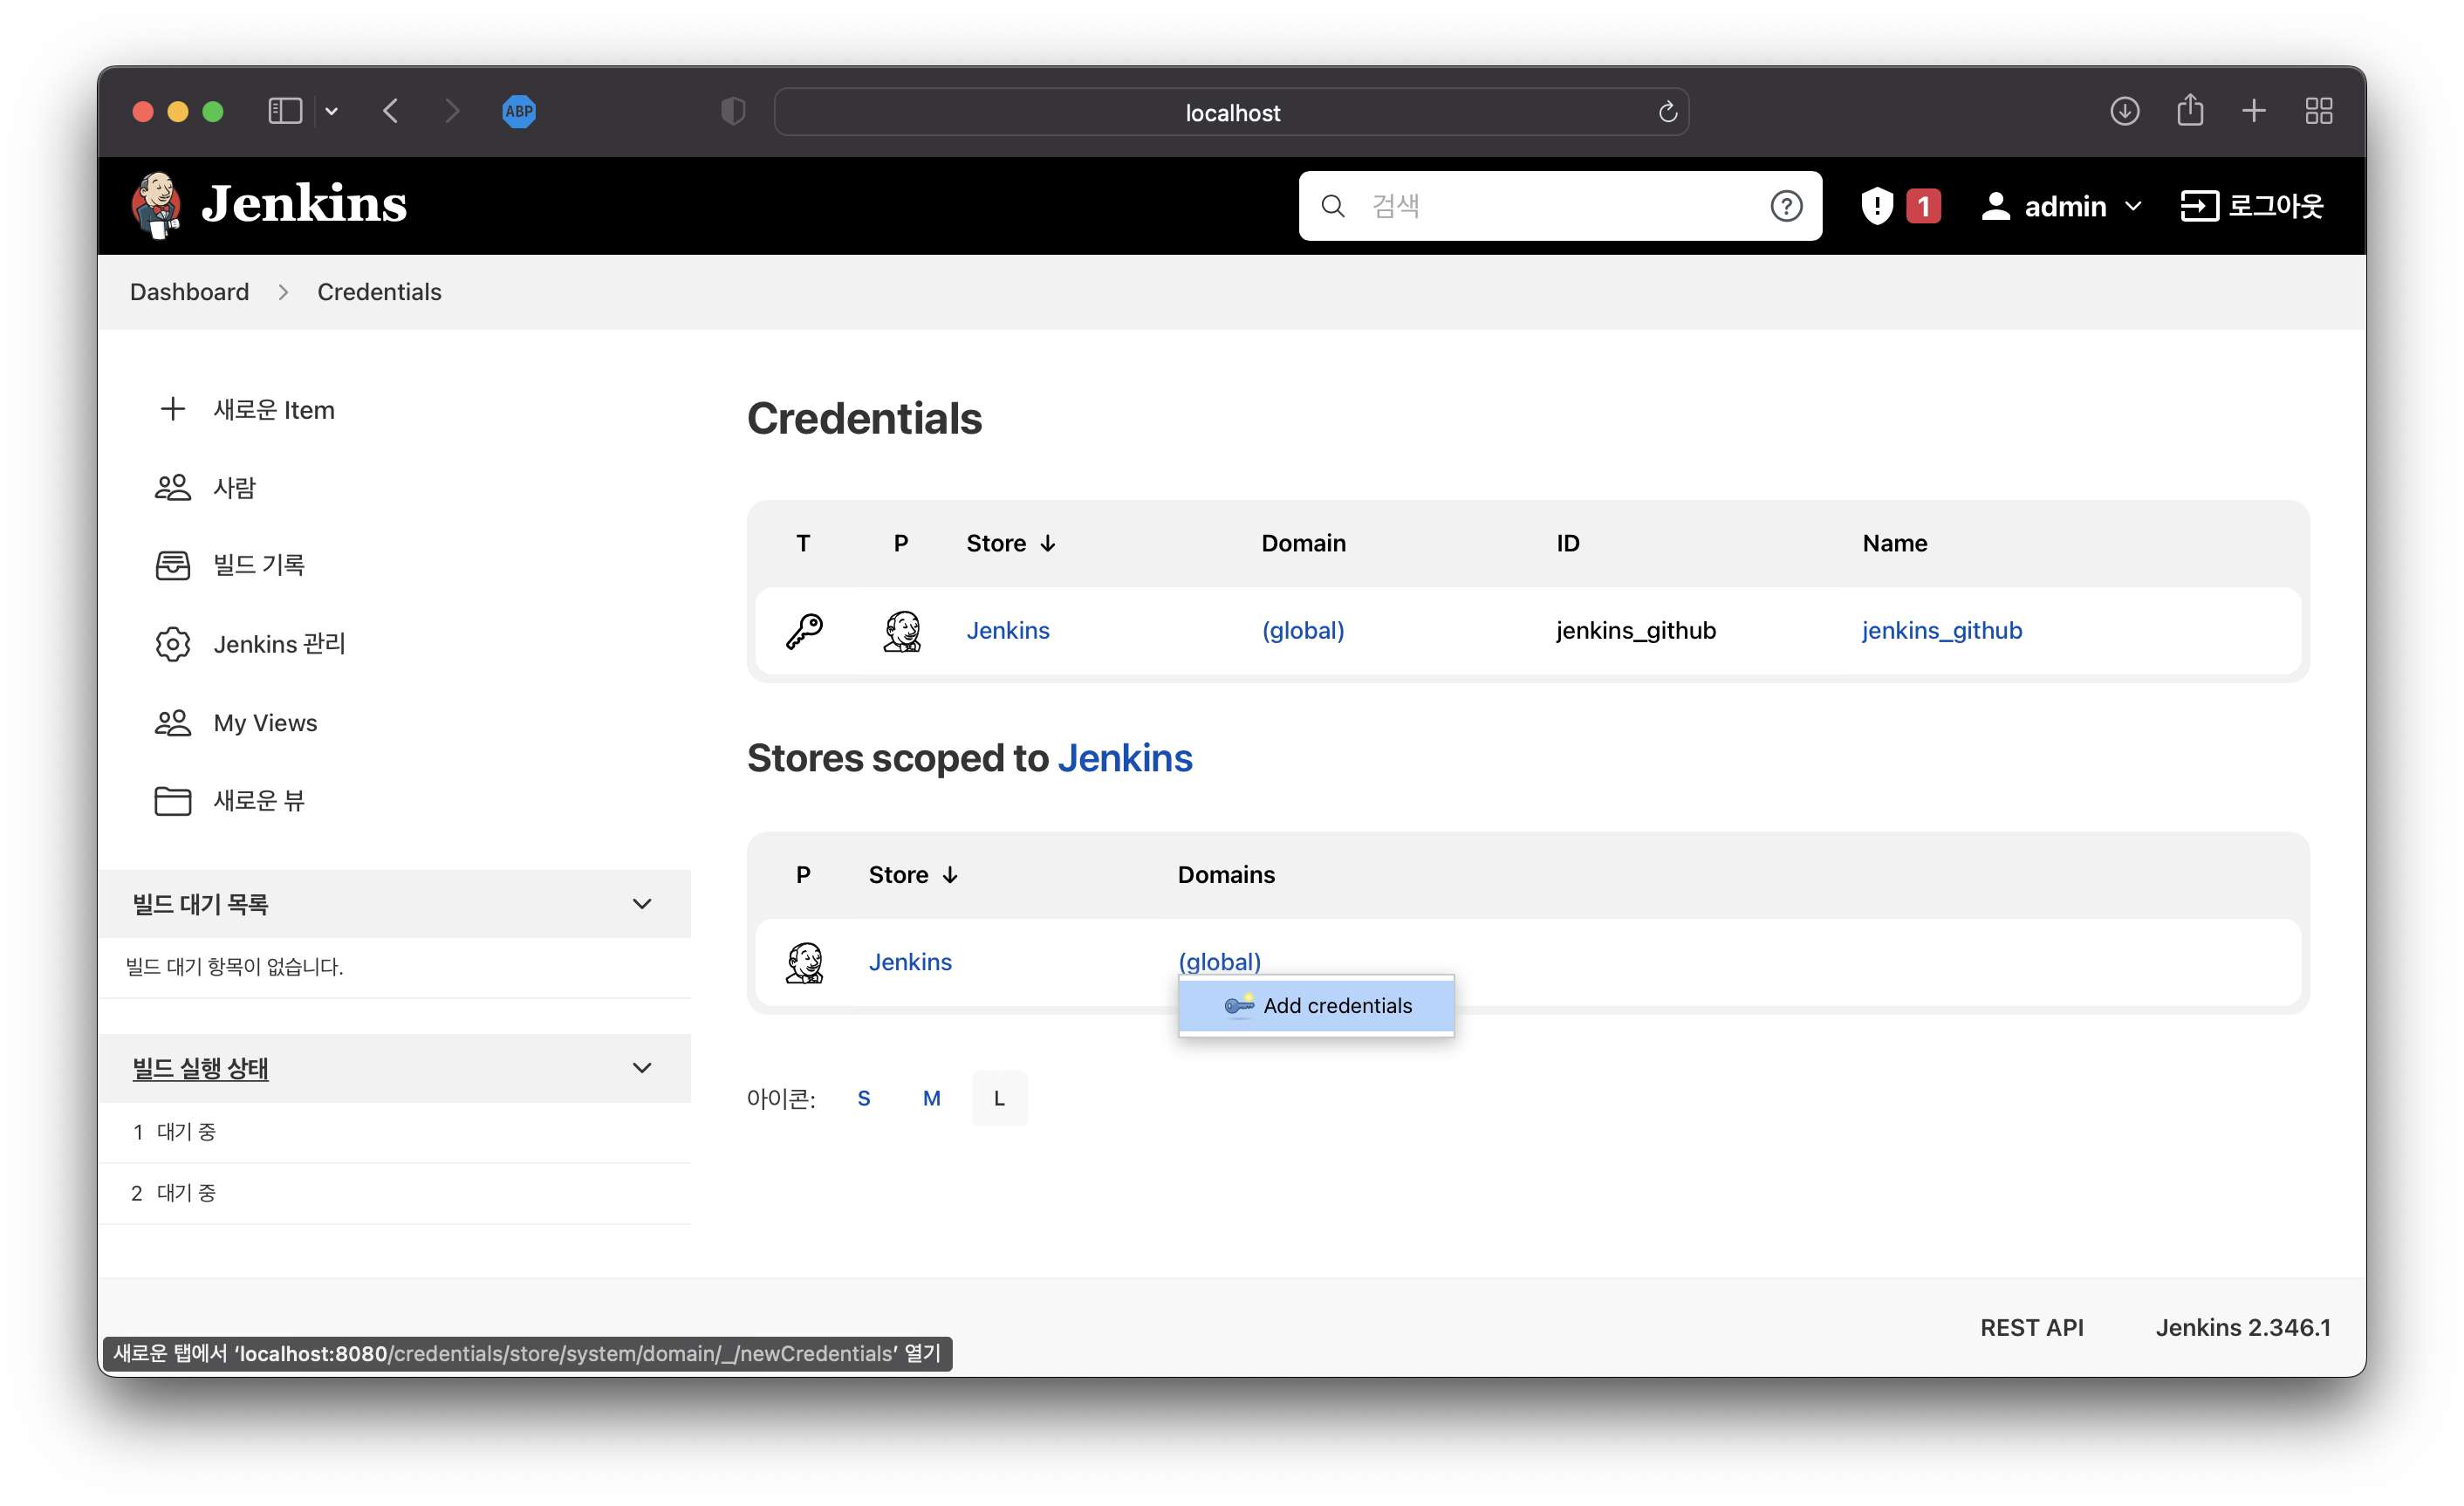
image-20220627220055393 Jenkins 관리>Manage Credentials로 이동Domains의 (global) 항목 선택하여
Add credentials클릭
Kind : Secret text
Scope : Global
ID : 이름 (e.g. ecr_cred)
Secret: JSON 형태의 Secret
aws_access_key_id
aws_secret_access_key
aws_session_token (sts 인 경우)
{"aws_access_key_id":"ASIA2LEU5EPEJQGXNMJU","aws_secret_access_key":"psGEnC5COCwcUojDo6EO/Ztd7J58THSVerEc7EE9","aws_session_token":"IQoJb3JpZ2luX2VjEMj//////////wEaCXVzLXdlc3QtMiJIMEYCIQDkdZ+GEya0j8gxM/Ow5GD5Kjr8e//pA/hARZm2Tok+JgIhAOrl0c8ctXkerxsNgSwAKSjmIrdbUyHxXVsuPl+GHgywKuAECOH//////////wEQARoMNzExMTI5Mzc1Njg4IgxAc1B5sczNlB7TgyAqtASCHs37YorM6spNTNftpvajNFGewy4z8ztDo83qx5+I67ldNnWnJBt2IHCYdtLBp1/wd/8yGYFKb/TWuOgjo0pdDKc2wJQ7gAbnB8d65OYzP2SSipqUJ/E4Tz/Ojgb0UQiAd8GcXEMdEe+9WBciSK5AD2CraMmbYlq2ThBjot8BOXJHG688IbI29/Qq+Y1WpozDpjNaeLm+kd9a9GWtX1XUXUvaXDcz+81RKW271uUp4n0JhfJ5PPUilxQVfISXtv7rEpp1PjhDE3c/oK6muK8SeeIIX7fAGi1cXqHMw9PfolQY6oAHUp3Acq+8uakNyOw8Usfl9xRDf1hQyAfofsz00DCmiZinuam8dg32R1pHW7JRBYgXXD5/dnp1A7KgdrjhjECpU8+Ayo/dAOqohOfTBYS/xMrVs8tkfUxHd/AKCca5oYda1YyIxdweBp/kEZHCZTkEpzY2TxEtzVsm5fEbjTViemglVmnkeDoZGeERVyXJlxVzW2of8I3hmKAeCENcH5L+Y"}
Pipeline
좌측
+ 새로운 Item버튼 클릭이름 입력 (e.g. Nomad Job - Docker Driver)
Pipeline 선택 후
OK성성된 Jenkins Job의 Pipeline에 스크립트 구성 (Private)
pipeline {
    agent any
    triggers {
        cron('H */8 * * *') //regular builds
        pollSCM('* * * * *') //polling for changes, here once a minute
    }
    tools {
        git('local')
        gradle('gradle')
        jdk("jdk11")
    }
    environment {
        NOMAD_ADDR = 'http://localhost:4646'
        NOMAD_DOWNLOAD_URL = 'https://releases.hashicorp.com/nomad/1.3.1/nomad_1.3.1_darwin_amd64.zip'
        DOCKER_REGISTRY = '**********.dkr.ecr.ap-northeast-2.amazonaws.com'
        dockerImage = ''
        PATH = "/Users/gs/.rd/bin:${PATH}"
    }
    stages {
        stage('Clone') {
            steps {
                git branch: 'main',
                    credentialsId: 'jenkins_github',
                    url: 'https://github.com/Great-Stone/jenkins-gradle-nomad-pipeline'
                sh "ls -lat"
            }
        }
        stage('Test') {
            steps {
                sh './gradlew test'
            }
        }
        stage('Java Build') {
            steps {
                sh './gradlew build'
            }
        }
        stage('Docker Build') {
            steps {
                script{
                    dockerImage = docker.build DOCKER_REGISTRY + "/demo:${BUILD_NUMBER}"
                }
            }
        }
        stage('Docker Push') {
            steps {
                script {
                    withCredentials([string(credentialsId: 'sts', variable: 'CREDS')]) {
                        def creds = readJSON text: CREDS
                        withEnv([
                            "AWS_ACCESS_KEY_ID=${creds.aws_access_key_id}",
                            "AWS_SECRET_ACCESS_KEY=${creds.aws_secret_access_key}",
                            "AWS_SESSION_TOKEN=${creds.aws_session_token}"
                        ]) {
                            sh '''
                            ECR_TOKEN=$(/usr/local/bin/aws ecr get-login-password --region ap-northeast-2)
                            echo "${ECR_TOKEN}" > ecr_token.txt

                            echo "${ECR_TOKEN}" | docker login -u AWS --password-stdin ${DOCKER_REGISTRY}
														'''
                            dockerImage.push()
                        }
                    }
                }
            }
        }
        stage('Nomad Download') {
            steps {
                sh 'curl -C - --output nomad.zip ${NOMAD_DOWNLOAD_URL}'
                sh 'unzip -o nomad.zip'
            }
        }
        stage('Deploy To Nomad') {
            input{
                message "Do you want to proceed for production deployment?"
            }
            steps {
                sh './nomad job run -var image=${DOCKER_REGISTRY}/demo -var tag=${BUILD_NUMBER} -var ecr_token=$(cat ecr_token.txt) ./nomad-docker.hcl'
            }
        }
    }
    post {
        always {
            sh 'docker rmi ${DOCKER_REGISTRY}/demo:${BUILD_NUMBER}'
        }
    }

}
지금 빌드를 클릭하여 빌드를 진행합니다. 마지막 단계에서 마우스 오버하여 승인처리합니다.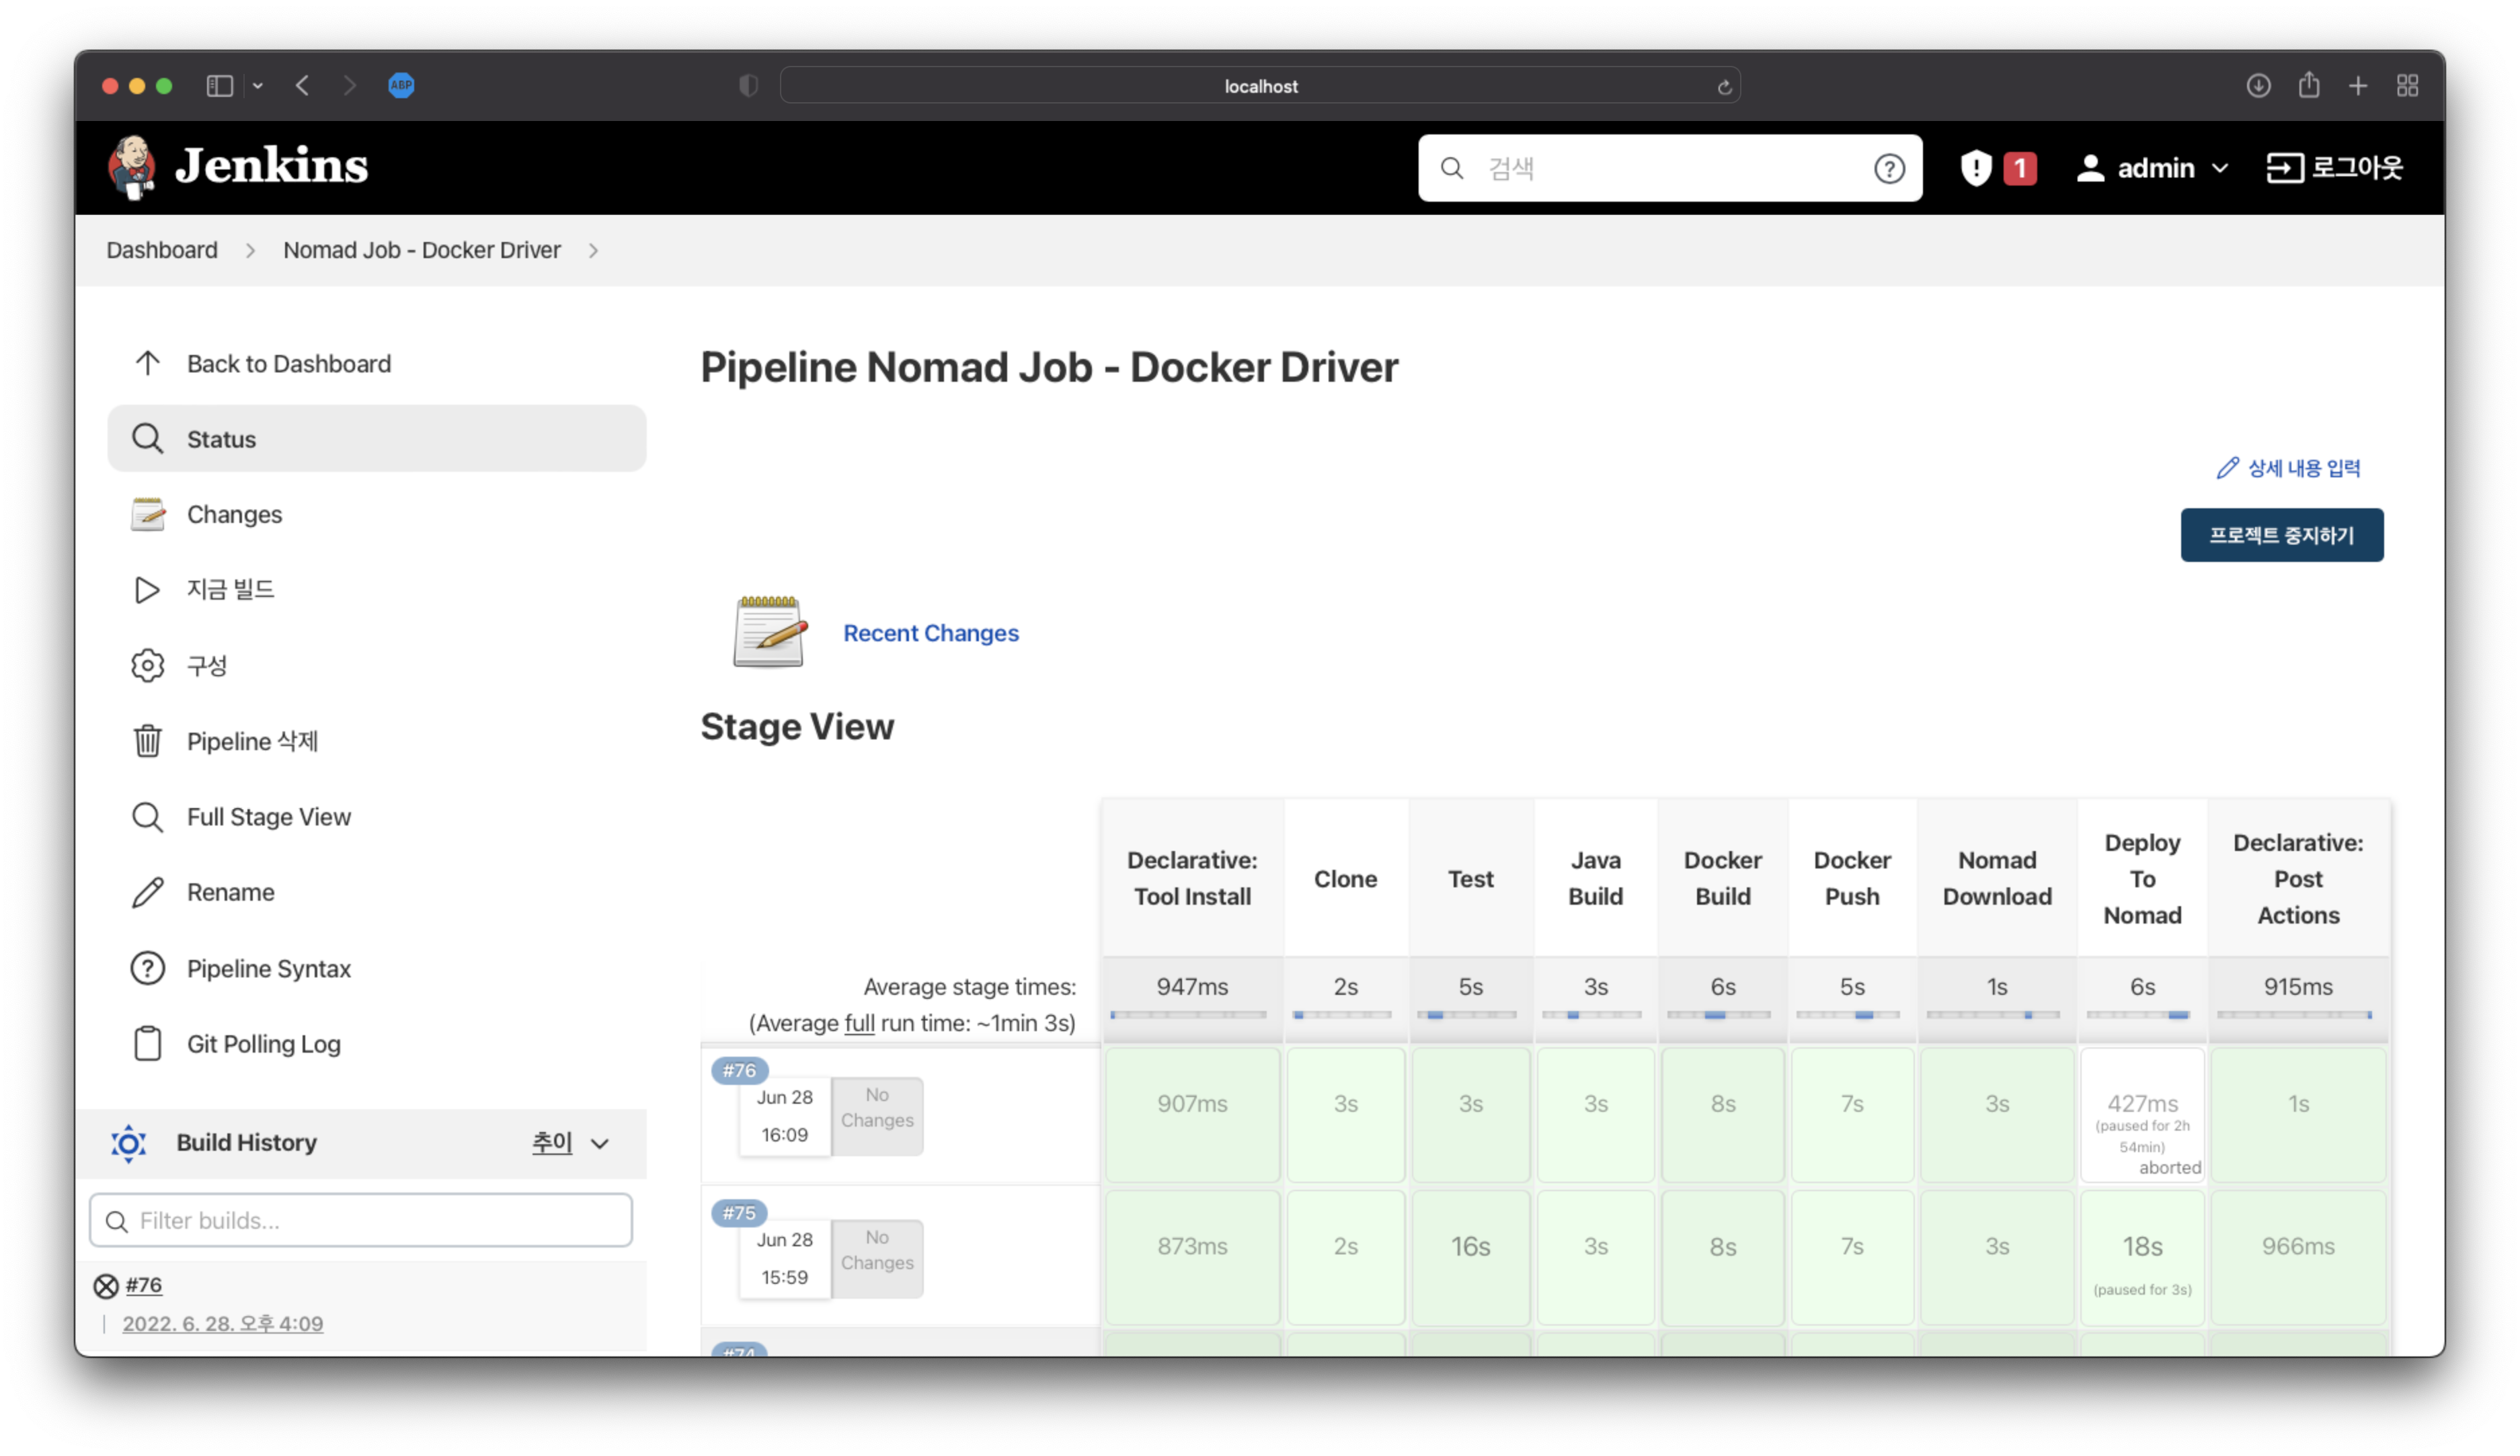
image-20220628190449600 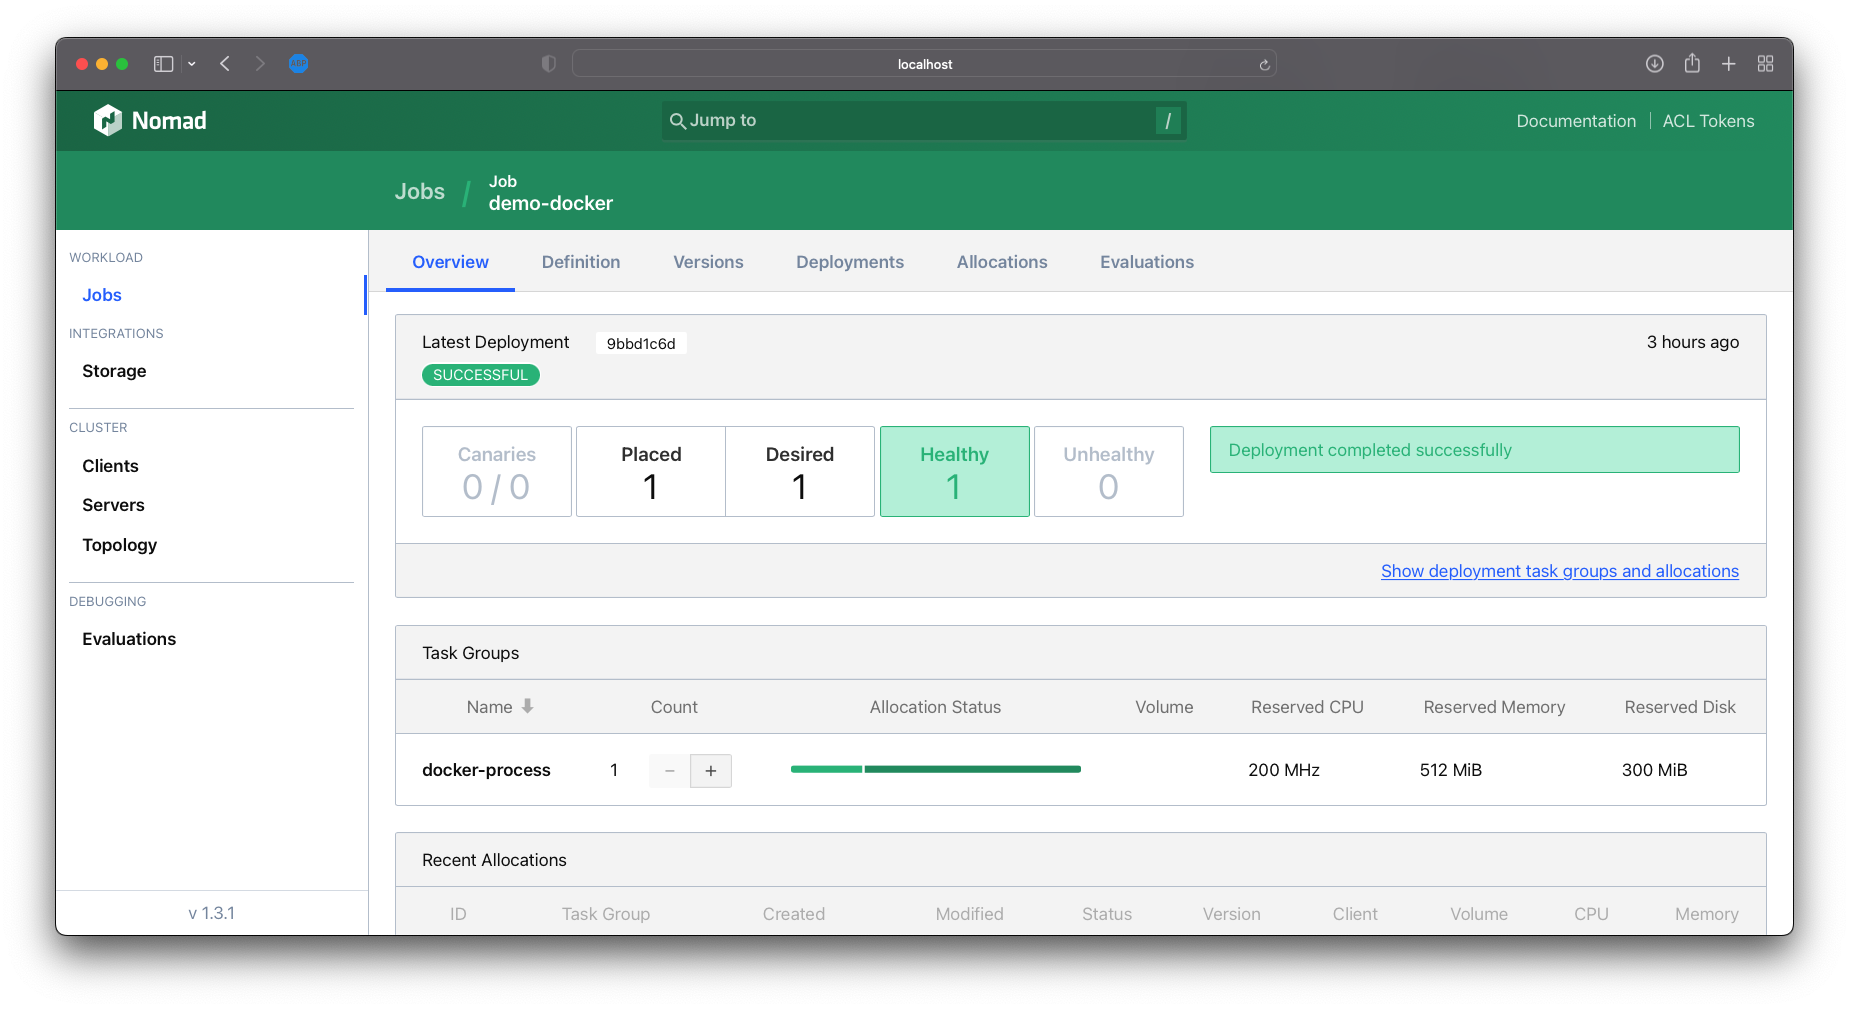
image-20220628190655610