ArgoCD Vault Plugin
ArgoCD Vault Plugin
참고 : 본 글은 AEWS 스터디 7주차 내용중 일부로 작성된 내용입니다.
1. ArgoCD
1) 개요 및 소개
Argo CD is a declarative, GitOps continuous delivery tool for Kubernetes.
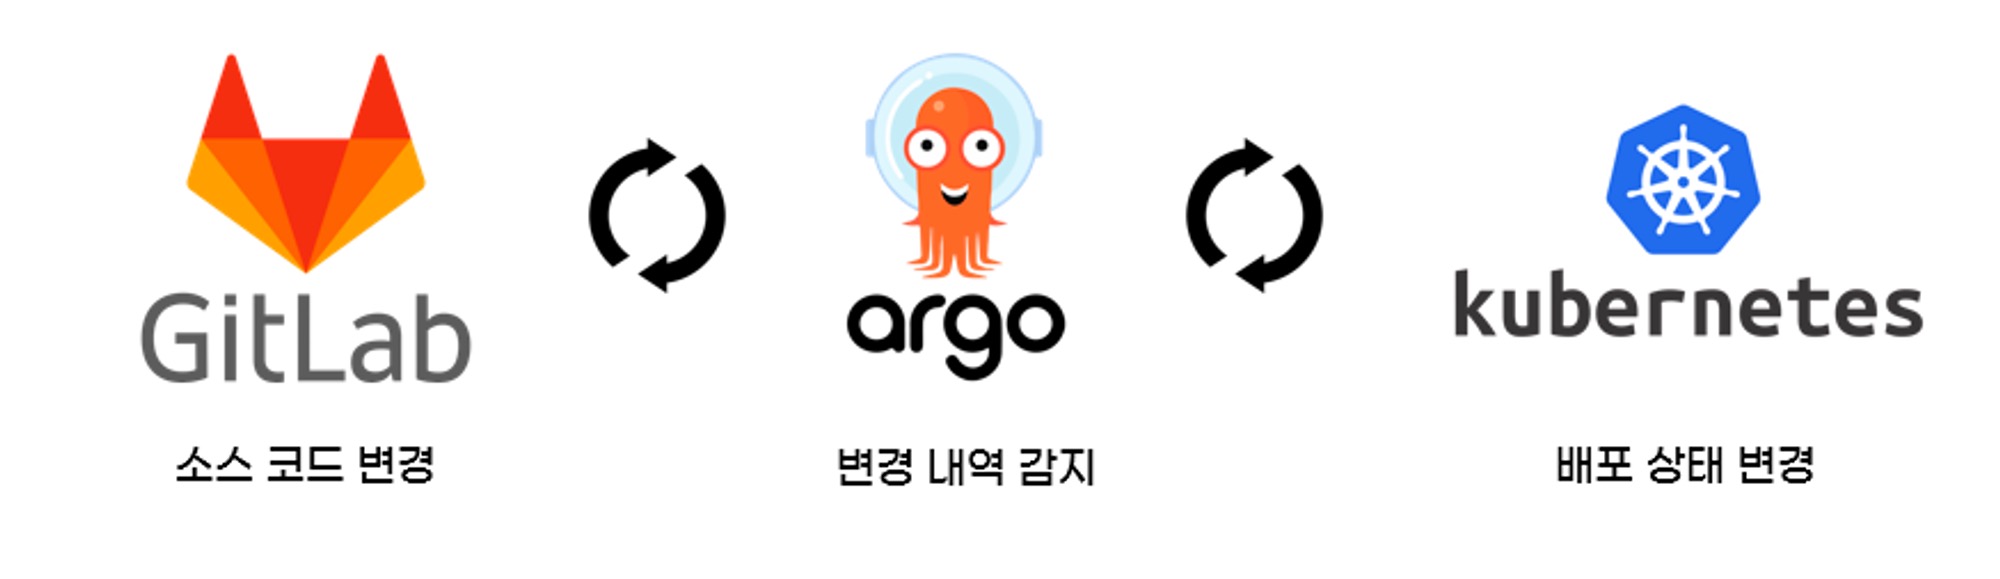
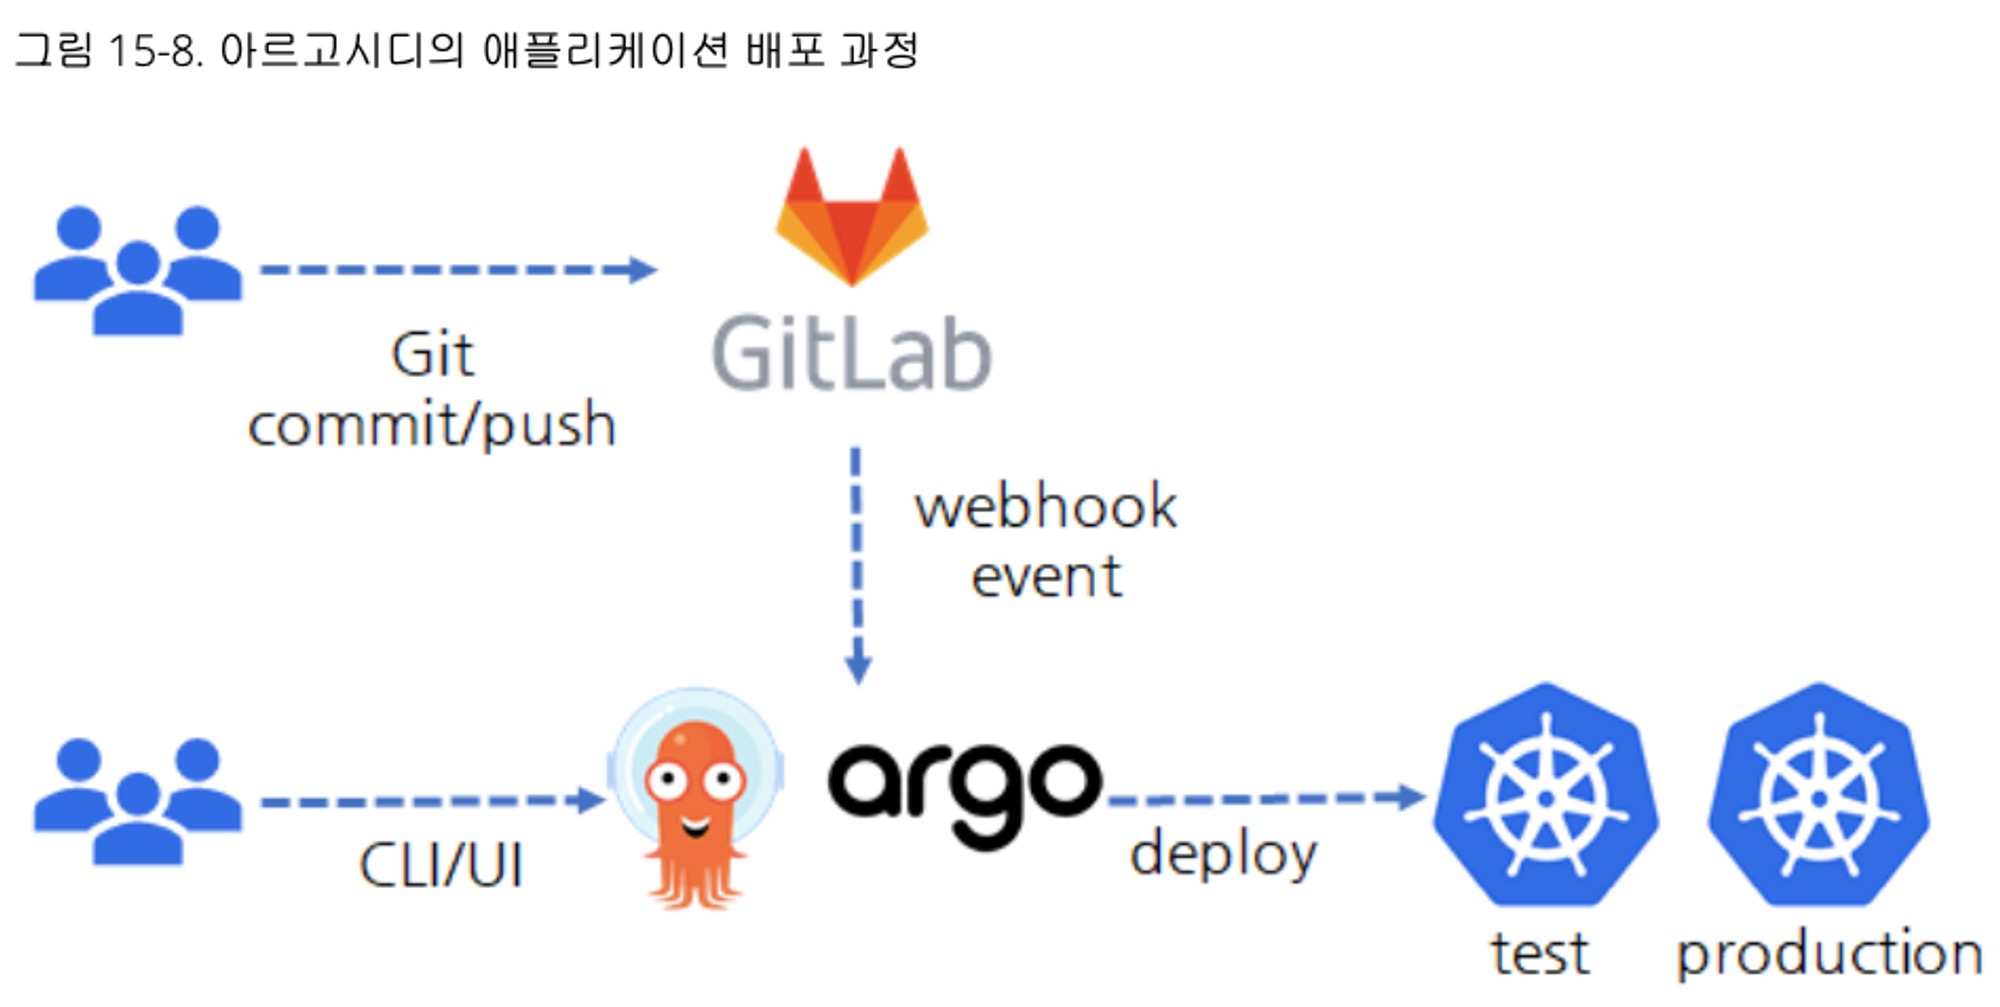
- 지속적인 배포란(Continuous Delivery, CD) 개발자가 소스코드를 변경해서 깃 저장소에 푸시하면 해당 변경 사항이 고객이 사용하는 실제 운영환경의 시스템까지 자동으로 반영함
- 개발자의 코드가 원격 저장소에 업로드됐을 때 아르고시디가 자동으로 해당 코드를 클러스터 운영환경에 배포합니다.
- 아르고시티로 배포한 헬름 애플리케이션의 리소스 목록, 각 리소스 간 관계 및 에러 유무를 UI로 보여줍니다.
- 단일 진실 원천(SSOT, Single Source Of Truth)이란 어떠한 진실(결과)의 원인이 하나의 이유(원천)에서 비롯되는 것을 의미합니다.
- 쿠버네티스 환경에서 깃옵스의 의미는 실제 운영 중인 클러스터의 상태를 개발자의 로컬 PC혹은 아무런 기록을 남기지 않고 클러스터에서 임의로 수정하게 하지 않고 공용으로 관리하는 깃 저장소에서만 유일하게 변경을 허용함으로써 단일 진실 원천(SSOT)를 구현합니다.
- 아르고시디를 사용하면 쿠버네티스 매니페스트 소스 파일을 여러 개발자의 개인 PC에 보관하지 않고 중앙의 통합된 깃 저장소에 반드시 업로드하고 동기화하도록 정책 관리 가능함
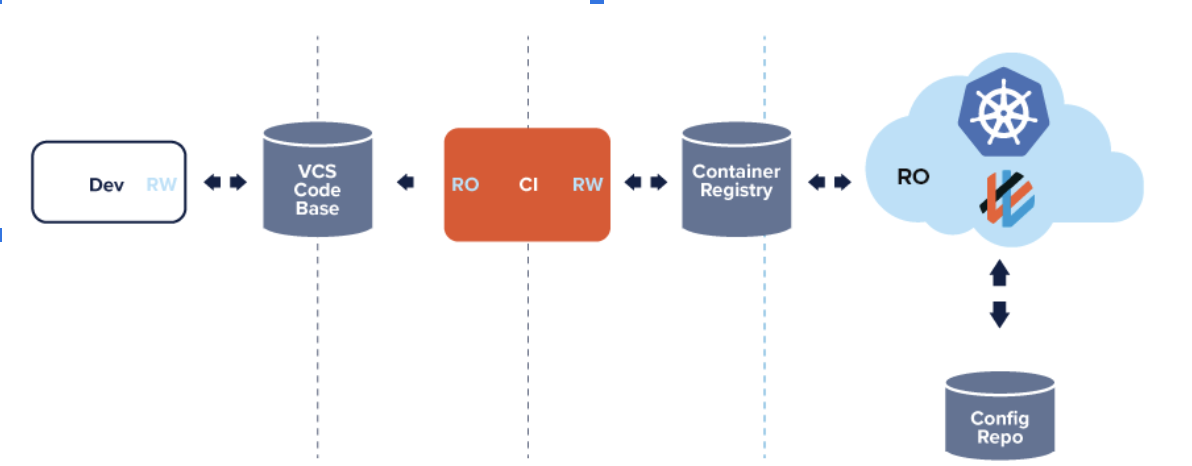
- GitOps - 출처(Automating Amazon EKS with GitOps)
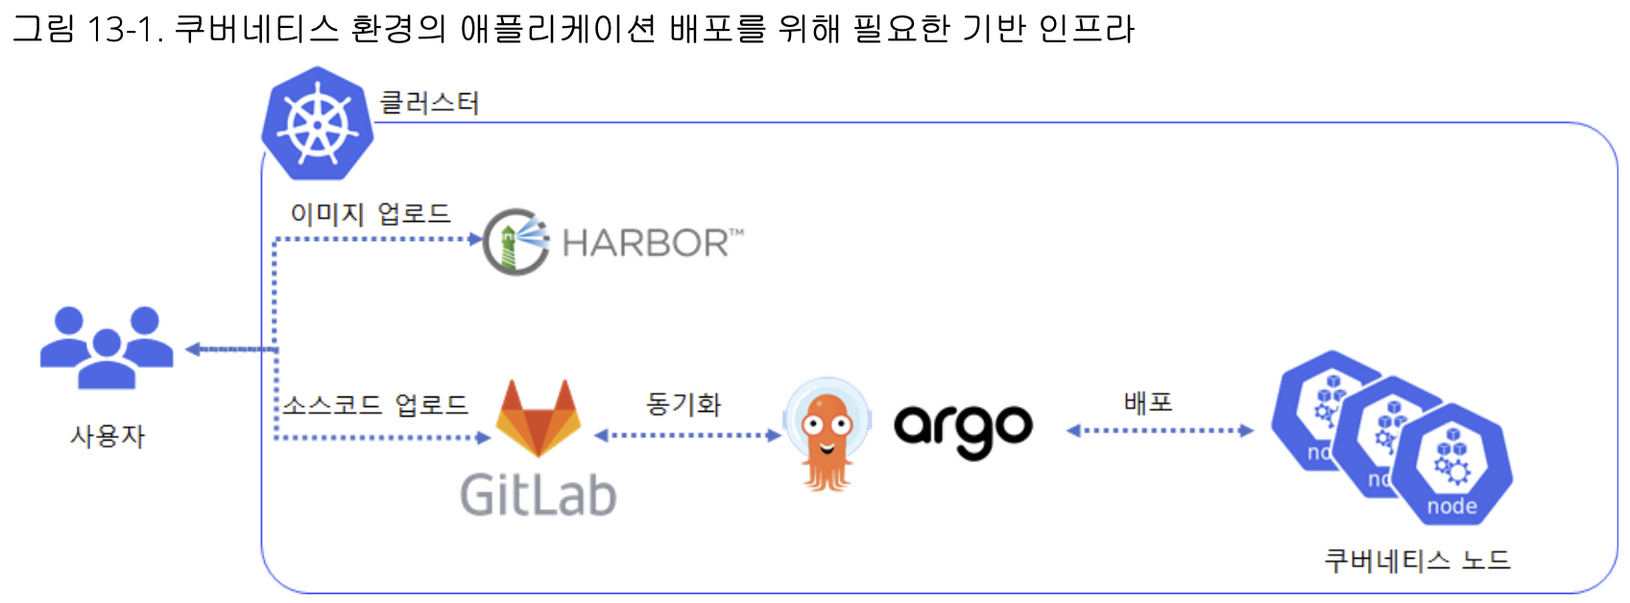
- 샘플 구성도 - 출처(https://logonme.net/tech/k8s/pkos2_w3/)
2) 설치
# 설치
helm repo add argo https://argoproj.github.io/argo-helm
helm repo update
helm install argocd argo/argo-cd --set server.service.type=LoadBalancer --namespace argocd --create-namespace --version 5.42.3

# External IP 확인
EXTERNAL_IP=$(k get svc -n argocd argocd-server -o jsonpath='{.status.loadBalancer.ingress[0].hostname}')
echo $EXTERNAL_IP

# admin 계정의 암호 확인
ARGOPW=$(kubectl -n argocd get secret argocd-initial-admin-secret -o jsonpath="{.data.password}" | base64 -d)
echo $ARGOPW
mf8bOtNEq7iHMqq1
(1) UI 접속 확인
(2) CLI 도구설치 및 연동
# 최신버전 설치
curl -sSL -o argocd-linux-amd64 https://github.com/argoproj/argo-cd/releases/latest/download/argocd-linux-amd64
install -m 555 argocd-linux-amd64 /usr/local/bin/argocd
chmod +x /usr/local/bin/argocd

# 버전 확인
argocd version --short

# argocd 서버 로그인
argocd login $EXTERNAL_IP --username admin --password $ARGOPW
WARNING: server certificate had error: tls: failed to verify certificate: x509: certificate signed by unknown authority. Proceed insecurely (y/n)? y
'admin:login' logged in successfully
Context 'k8s-argocd-argocdse-789cd00c72-b0b60b99b16f1fc7.elb.ap-northeast-2.amazonaws.com' updated

# 기 설치한 깃랩의 프로젝트 URL 을 argocd 깃 리포지토리(argocd repo)로 등록. 깃랩은 프로젝트 단위로 소스 코드를 보관.
argocd repo add <저장소 주소> --username <계정명> --password <암호>

# 등록 확인 : 기본적으로 아르고시디가 설치된 쿠버네티스 클러스터는 타깃 클러스터로 등록됨
argocd repo list
TYPE  NAME  REPO                                            INSECURE  OCI    LFS    CREDS  STATUS      MESSAGE  PROJECT
git         https://github.com/hyungwook0221/argo-demo.git  false     false  false  true   Successful

# 기본적으로 아르고시디가 설치된 쿠버네티스 클러스터는 타깃 클러스터로 등록됨
argocd cluster list
SERVER                          NAME        VERSION  STATUS   MESSAGE                                                  PROJECT
https://kubernetes.default.svc  in-cluster           Unknown  Cluster has no applications and is not being monitored.
3) 샘플 앱 배포
(1) Git 저장소 생성 및 다운
해당 저장소는 개인이 생성한 Git 저장소로 대체하셔도 됩니다.
필자가 만든 저장소를 그대로 사용한다면, "ArgoCD Application CRD" 챕터로 넘어가시면 됩ㄴ디ㅏ.
# Git 저장소 설정
git clone https://github.com/hyungwook0221/argo-demo.git
cd argo-demo

# 깃 원격 오리진 주소 확인
git config -l | grep remote.origin.url
remote.origin.url=https://github.com/hyungwook0221/argo-demo.git
(2) PostgreSQL 배포
참고 : https://artifacthub.io/packages/helm/bitnami/postgresql
- PostgreSQL 헬름차트 준비 및 Github 저장소
# PostgreSQL 헬름차트 추가 및 다운로드
helm repo add bitnami https://charts.bitnami.com/bitnami
helm fetch bitnami/postgresql --untar
cd postgresql/

# audit.logConnections=false에서 true로 변경
cat <<EOF > override-values.yaml
audit:
  logConnections: true
EOF

# 헬름 차트를 깃랩 저장소에 업로드
git add . && git commit -m "add postgresql helm"
git push
- ArgoCD Application CRD 준비 : postgresql-helm-argo-application.yml
# postgresql-helm-argo-application.yml
---
apiVersion: argoproj.io/v1alpha1
kind: Application
metadata:
  name: postgresql-helm
  namespace: argocd
spec:
  destination:
    namespace: postgresql
    server: https://kubernetes.default.svc
  project: default
  source:
    repoURL: https://github.com/hyungwook0221/argo-demo.git
    path: postgresql
    targetRevision: main
    helm:
      valueFiles:
      - override-values.yaml
  syncPolicy:
    syncOptions:
    - CreateNamespace=true
    automated:
      selfHeal: true
      prune: true
- CRD 배포 및 확인
# 모니터링 : argocd 웹 화면 보고 있기!
echo -e "Argocd Web URL = $EXTERNAL_IP"

# 배포
kubectl apply -f postgresql-helm-argo-application.yml

# YAML 파일을 적용(apply)하여 아르고시디 ‘Application’ CRD를 생성
kubectl get applications.argoproj.io -n argocd
NAME              SYNC STATUS   HEALTH STATUS
postgresql-helm   Synced        Healthy

# argocd app 배포 확인
argocd app get postgresql-helm
Name:               argocd/postgresql-helm
Project:            default
Server:             https://kubernetes.default.svc
Namespace:          postgresql
URL:                https://k8s-argocd-argocdse-789cd00c72-b0b60b99b16f1fc7.elb.ap-northeast-2.amazonaws.com/applications/postgresql-helm
Repo:               https://github.com/hyungwook0221/argo-demo.git
Target:             main
Path:               postgresql
Helm Values:        override-values.yaml
SyncWindow:         Sync Allowed
Sync Policy:        Automated (Prune)
Sync Status:        Synced to main (cf8a47a)
Health Status:      Healthy

GROUP  KIND         NAMESPACE   NAME                STATUS     HEALTH   HOOK  MESSAGE
       Namespace                postgresql          Succeeded  Synced         namespace/postgresql created
       Secret       postgresql  postgresql-helm     Synced                    secret/postgresql-helm created
       Service      postgresql  postgresql-helm-hl  Synced     Healthy        service/postgresql-helm-hl created
       Service      postgresql  postgresql-helm     Synced     Healthy        service/postgresql-helm created
apps   StatefulSet  postgresql  postgresql-helm     Synced     Healthy        statefulset.apps/postgresql-helm created
- AargoCD GitHub/GitLab Deploy 아키텍처(참고 : 가시다 스터디)
2. Argo CD Vault Plugin
Argo CD에는 다양한 시크릿 관리 도구(HashiCorp Vault, IBM Cloud Secrets Manager, AWS Secrets Manager 등)플러그인을 통해 Kubernetes 리소스에 주입할 수 있도록 지원합니다.
플러그인을 통해 Operator 또는 CRD(Custom Resource Definition)에 의존하지 않고 GitOps와 Argo CD로 시크릿 관리 문제를 해결할 수 있습니다.특히 Secret 뿐만 아니라, deployment, configMap 또는 기타 Kubernetes 리소스에도 사용할 수 있습니다.
필자는 그 중에서 가장 대표적인 시크릿 관리 도구인 HashiCorp Vault 플러그인을 연동하는 방법을 알아보겠습니다.
1) Vault 환경 준비
(1) Vault 설치
# 저장소 추가
helm repo add hashicorp https://helm.releases.hashicorp.com

# 저장소 업데이트
helm repo update

# 저장소 추가확인
helm search repo hashicorp/vault

# vault-server-values.yaml
---
server:
  dev:
    enabled: true
    devRootToken: "root"
  logLevel: debug

injector:
  enabled: "false"

# vault 헬름차트 배포
helm install vault hashicorp/vault -n vault --create-namespace --values vault-server-values.yaml
(2) Vault 구성
- 시크릿 엔진 설정
# shell 접속
kubectl exec -n vault vault-0 -it -- sh

# enable kv-v2 engine in Vault
vault secrets enable kv-v2

# create kv-v2 secret with two keys
vault kv put kv-v2/demo user="secret_user" password="secret_password"

# create policy to enable reading above secret
vault policy write demo - <<EOF
path "kv-v2/data/demo" {
  capabilities = ["read"]
}
EOF
- 인증방식 활성화
# enable Kubernetes Auth Method
vault auth enable kubernetes

# get Kubernetes host address
# K8S_HOST="https://kubernetes.default.svc"
# K8S_HOST="https://$(env | grep KUBERNETES_PORT_443_TCP_ADDR| cut -f2 -d'='):443"
# K8S_HOST="https://$( kubectl exec -n vault vault-0 -- env | grep KUBERNETES_PORT_443_TCP_ADDR| cut -f2 -d'='):443"

# get Service Account token from Vault Pod
#SA_TOKEN=$(cat /var/run/secrets/kubernetes.io/serviceaccount/token)
# SA_TOKEN=$(kubectl exec -n vault vault-0 -- cat /var/run/secrets/kubernetes.io/serviceaccount/token)

# get Service Account CA certificate from Vault Pod
#SA_CERT=$(cat /var/run/secrets/kubernetes.io/serviceaccount/ca.crt)
#SA_CERT=$(kubectl exec -n vault vault-0 -- cat /var/run/secrets/kubernetes.io/serviceaccount/ca.crt)

# configure Kubernetes Auth Method
# kubectl exec -n vault vault-0 -- vault write auth/kubernetes/config \
#     token_reviewer_jwt=$SA_TOKEN \
#     kubernetes_host=$K8S_HOST \
#     kubernetes_ca_cert=$SA_CERT

# 인증방식 업데이트
vault write auth/kubernetes/config \
  token_reviewer_jwt="$(cat /var/run/secrets/kubernetes.io/serviceaccount/token)" \
  kubernetes_host="https://$KUBERNETES_PORT_443_TCP_ADDR:443" \
  kubernetes_ca_cert=@/var/run/secrets/kubernetes.io/serviceaccount/ca.crt

# create authenticate Role for ArgoCD
vault write auth/kubernetes/role/argocd \
  bound_service_account_names=argocd-repo-server \
  bound_service_account_namespaces=argocd \
  policies=demo \
  ttl=48h

exit
(3) ArgoCD Vault Plugin Credentials 생성
💡 참고
kind: Secret
apiVersion: v1
metadata:
  name: argocd-vault-plugin-credentials
  namespace: argocd
type: Opaque
stringData:
  AVP_AUTH_TYPE: "k8s"
  AVP_K8S_ROLE: "argocd"
  AVP_TYPE: "vault"
  VAULT_ADDR: "http://vault.vault:8200"
2) Vault Plugin 설치
공식문서를 통해 Argo CD에 Vault Plugin을 설치하는 방법은 크게 4가지 방법 있으며, 크게는 2가지 방법으로 구분해서 소개하고 있습니다. 참고
(0) 설치방안 2 가지
방안1. Installation via a sidecar container (new, starting with Argo CD v2.4.0)
Download AVP and supporting tools into a volume and control everything as Kubernetes manifests, using an off-the-shelf sidecar image
- Available as a pre-built Kustomize app: https://github.com/argoproj-labs/argocd-vault-plugin/blob/main/manifests/cmp-sidecar
Create a custom sidecar image with AVP and supporting tools pre-installed
방안2. Installation via
argocd-cmConfigMap (2.6.0에 deprecated 예정)Download AVP in a volume and control everything as Kubernetes manifests
- Available as a pre-built Kustomize app: https://github.com/argoproj-labs/argocd-vault-plugin/blob/main/manifests/cmp-configmap
Create a custom
argocd-repo-serverimage with AVP and supporting tools pre-installed
방안1-1) Installaion via a sidecar(with Manual)
필자는 v2.4.0부터 제공되는 사이드카 방식을 통해 구성하는 방법을 채택했습니다.
a. InitContainer and configuration via sidecar
사이드카 컨테이너에 마운트할 컨피그맵에서 플러그인을 정의
💡 참고 :
apiVersion: v1
kind: ConfigMap
metadata:
  name: cmp-plugin
  namespace: argocd
data:
  avp.yaml: |
    apiVersion: argoproj.io/v1alpha1
    kind: ConfigManagementPlugin
    metadata:
      name: argocd-vault-plugin
    spec:
      allowConcurrency: true
      discover:
        find:
          command:
            - sh
            - "-c"
            - "find . -name '*.yaml' | xargs -I {} grep \"<path\\|avp\\.kubernetes\\.io\" {} | grep ."
      generate:
        command:
          - argocd-vault-plugin
          - generate
          - "."
      lockRepo: false
  avp-helm.yaml: |
    ---
    apiVersion: argoproj.io/v1alpha1
    kind: ConfigManagementPlugin
    metadata:
      name: argocd-vault-plugin-helm
    spec:
      allowConcurrency: true

      # Note: this command is run _before_ any Helm templating is done, therefore the logic is to check
      # if this looks like a Helm chart
      discover:
        find:
          command:
            - sh
            - "-c"
            - "find . -name 'Chart.yaml' && find . -name 'values.yaml'"
      generate:
        # **IMPORTANT**: passing `${ARGOCD_ENV_helm_args}` effectively allows users to run arbitrary code in the Argo CD
        # repo-server (or, if using a sidecar, in the plugin sidecar). Only use this when the users are completely trusted. If
        # possible, determine which Helm arguments are needed by your users and explicitly pass only those arguments.
        command:
          - sh
          - "-c"
          - |
            helm template $ARGOCD_APP_NAME -n $ARGOCD_APP_NAMESPACE ${ARGOCD_ENV_HELM_ARGS} . |
            argocd-vault-plugin generate -s argocd:argocd-vault-plugin-credentials -
      lockRepo: false
  avp-kustomize.yaml: |
    ---
    apiVersion: argoproj.io/v1alpha1
    kind: ConfigManagementPlugin
    metadata:
      name: argocd-vault-plugin-kustomize
    spec:
      allowConcurrency: true

      # Note: this command is run _before_ anything is done, therefore the logic is to check
      # if this looks like a Kustomize bundle
      discover:
        find:
          command:
            - find
            - "."
            - -name
            - kustomization.yaml
      generate:
        command:
          - sh
          - "-c"
          - "kustomize build . | argocd-vault-plugin generate -"
      lockRepo: false
---
argocd-repo-server를 패치하여 argocd-vault-plugin을 다운로드하고 사이드카를 정의하기 위한 initContainer를 추가합니다.
💡 참고 :
apiVersion: apps/v1
kind: Deployment
metadata:
  name: argocd-repo-server
spec:
  template:
    spec:
      automountServiceAccountToken: true
      volumes:
      # volumes절 아래 추가
      - configMap:
          name: cmp-plugin
        name: cmp-plugin
      - name: custom-tools
        emptyDir: {}
      initContainers:
      # initContainers 절 아래 추가
      # 필자는 편의상 alpine/curl 이미지 사용하여 바이너리 다운로드
      - name: download-tools
        image: alpine/curl
        env:
          - name: AVP_VERSION
            value: 1.15.0
        command: [sh, -c]
        args:
          - >-
            curl -L https://github.com/argoproj-labs/argocd-vault-plugin/releases/download/v$(AVP_VERSION)/argocd-vault-plugin_$(AVP_VERSION)_linux_amd64 -o argocd-vault-plugin &&
            chmod +x argocd-vault-plugin &&
            mv argocd-vault-plugin /custom-tools/
        volumeMounts:
          - mountPath: /custom-tools
            name: custom-tools
      # argocd-vault-plugin 배포방안(3가지 중 선택)
      containers:
      # AVP : argocd-vault-plugin with plain YAML
      - name: avp
        command: [/var/run/argocd/argocd-cmp-server]
        image: quay.io/argoproj/argocd:v2.7.4
        securityContext:
          runAsNonRoot: true
          runAsUser: 999
        volumeMounts:
          - mountPath: /var/run/argocd
            name: var-files
          - mountPath: /home/argocd/cmp-server/plugins
            name: plugins
          - mountPath: /tmp
            name: tmp

          # Register plugins into sidecar
          - mountPath: /home/argocd/cmp-server/config/plugin.yaml
            subPath: avp.yaml
            name: cmp-plugin

          # Important: Mount tools into $PATH
          - name: custom-tools
            subPath: argocd-vault-plugin
            mountPath: /usr/local/bin/argocd-vault-plugin

      # AVP-Helm : argocd-vault-plugin with Helm
      - name: avp-helm
        command: [/var/run/argocd/argocd-cmp-server]
        image: quay.io/argoproj/argocd:v2.7.4
        securityContext:
          runAsNonRoot: true
          runAsUser: 999
        volumeMounts:
          - mountPath: /var/run/argocd
            name: var-files
          - mountPath: /home/argocd/cmp-server/plugins
            name: plugins
          - mountPath: /tmp
            name: tmp

          # Register plugins into sidecar
          - mountPath: /home/argocd/cmp-server/config/plugin.yaml
            subPath: avp-helm.yaml
            name: cmp-plugin

          # Important: Mount tools into $PATH
          - name: custom-tools
            subPath: argocd-vault-plugin
            mountPath: /usr/local/bin/argocd-vault-plugin

      # AVP-Kustomize : argocd-vault-plugin with Kustomize
      - name: avp-kustomize
        command: [/var/run/argocd/argocd-cmp-server]
        image: quay.io/argoproj/argocd:v2.4.0
        securityContext:
          runAsNonRoot: true
          runAsUser: 999
        volumeMounts:
          - mountPath: /var/run/argocd
            name: var-files
          - mountPath: /home/argocd/cmp-server/plugins
            name: plugins
          - mountPath: /tmp
            name: tmp

          # Register plugins into sidecar
          - mountPath: /home/argocd/cmp-server/config/plugin.yaml
            subPath: avp-kustomize.yaml
            name: cmp-plugin

          # Important: Mount tools into $PATH
          - name: custom-tools
            subPath: argocd-vault-plugin
            mountPath: /usr/local/bin/argocd-vault-plugin
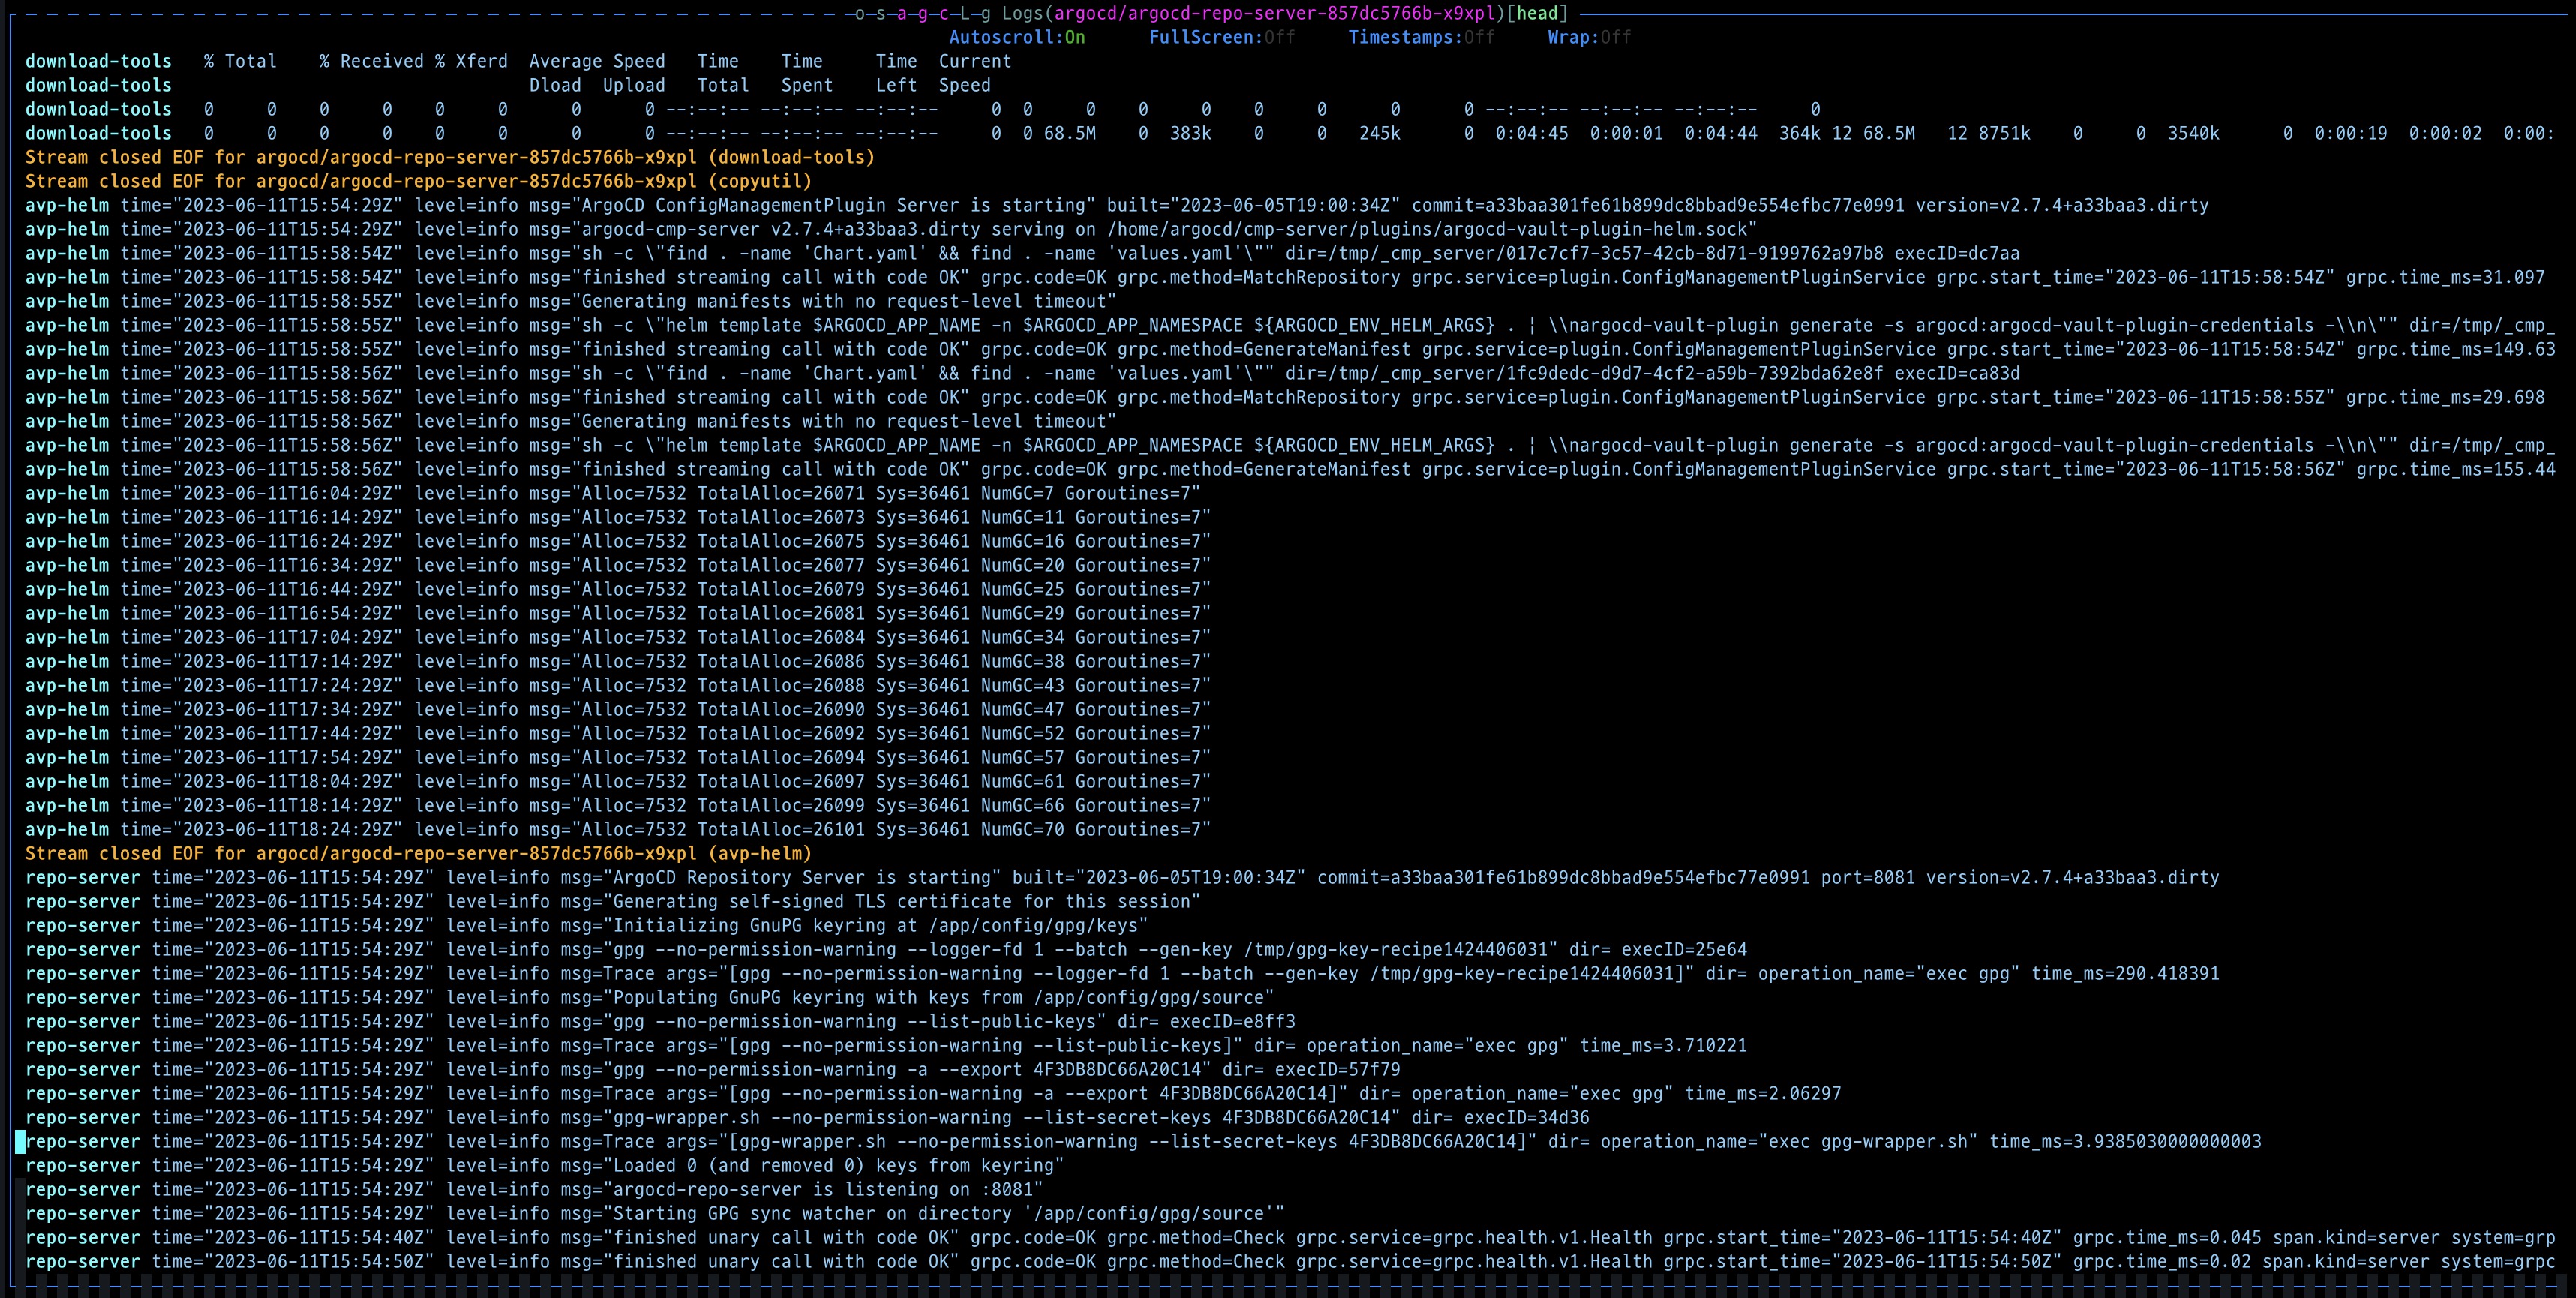
- 편집 후 재기동 로그 확인
방안1-2) Installaion via a sidecar(with Helm)
💡 참고
a. ConfigManagementPlugin 설정을 위한 configMap 생성 - 링크
apiVersion: v1
kind: ConfigMap
metadata:
  name: cmp-plugin
  namespace: argocd
data:
  avp-helm.yaml: |
    apiVersion: argoproj.io/v1alpha1
    kind: ConfigManagementPlugin
    metadata:
      name: argocd-vault-plugin-helm
    spec:
      allowConcurrency: true
      discover:
        find:
          command:
            - sh
            - "-c"
            - "find . -name 'Chart.yaml' && find . -name 'values.yaml'"
      generate:
        command:
          - bash
          - "-c"
          - |
            helm template $ARGOCD_APP_NAME --include-crds -n $ARGOCD_APP_NAMESPACE -f ${ARGOCD_ENV_HELM_VALUES} . |
            argocd-vault-plugin generate -s argocd:argocd-vault-plugin-credentials -
      lockRepo: false
💡 참고
b. ArgoCD wi5th Vault Plugin Helm Chart 작성
argocd-helm-values.yaml
repoServer:
  rbac:
    - verbs:
        - get
        - list
        - watch
      apiGroups:
        - ''
      resources:
        - secrets
        - configmaps
  initContainers:
    - name: download-tools
      image: alpine/curl
      env:
        - name: AVP_VERSION
          value: 1.14.0
      command: [sh, -c]
      args:
        - >-
          curl -L https://github.com/argoproj-labs/argocd-vault-plugin/releases/download/v$(AVP_VERSION)/argocd-vault-plugin_$(AVP_VERSION)_linux_amd64 -o argocd-vault-plugin &&
          chmod +x argocd-vault-plugin &&
          mv argocd-vault-plugin /custom-tools/
      volumeMounts:
        - mountPath: /custom-tools
          name: custom-tools
  extraContainers:
    - name: avp-helm
      command: [/var/run/argocd/argocd-cmp-server]
      image: quay.io/argoproj/argocd:v2.7.4
      securityContext:
        runAsNonRoot: true
        runAsUser: 999
      volumeMounts:
        - mountPath: /var/run/argocd
          name: var-files
        - mountPath: /home/argocd/cmp-server/plugins
          name: plugins
        - mountPath: /tmp
          name: tmp-dir
        - mountPath: /home/argocd/cmp-server/config
          name: cmp-plugin
        - name: custom-tools
          subPath: argocd-vault-plugin
          mountPath: /usr/local/bin/argocd-vault-plugin
  volumes:
    - configMap:
        name: cmp-plugin
      name: cmp-plugin
    - name: custom-tools
      emptyDir: {}
    - name: tmp-dir
      emptyDir: {}

# If you face issue with ArgoCD CRDs installation, then uncomment below section to disable it
#crds:
#  install: false
방안2) Installation via arocd-cm ConfigMap
해당 방안의 경우에는 argocd-cm configMap을 수정하여 적용하는 방안입니다.
💡 참고 : 2.6.0에서 Deprecated 될 예정
      containers:
      - name: argocd-repo-server
        # volumeMounts절에 custom-tools 추가
        volumeMounts:
        - name: custom-tools
          mountPath: /usr/local/bin/argocd-vault-plugin
          subPath: argocd-vault-plugin
  	  # volume절에 custom-tools 추가
      volumes:
      - name: custom-tools
        emptyDir: {}
      # init Container 추가
      initContainers:
      - name: download-tools
        image: alpine:3.8
        command: [sh, -c]
        # Don't forget to update this to whatever the stable release version is
        # Note the lack of the `v` prefix unlike the git tag
        env:
          - name: AVP_VERSION
            value: "1.14.0"
        args:
          - >-
            wget -O argocd-vault-plugin
            https://github.com/argoproj-labs/argocd-vault-plugin/releases/download/v${AVP_VERSION}/argocd-vault-plugin_${AVP_VERSION}_linux_amd64 &&
            chmod +x argocd-vault-plugin &&
            mv argocd-vault-plugin /custom-tools/
        volumeMounts:
          - mountPath: /custom-tools
            name: custom-tools
3) 샘플 애플리케이션 배포
(1) 저장소 추가
💡 참고 : Git 저장소에 대한 Fork 후 진행
# 샘플 애플리케이션 배포를 위한 저장소 추가
# argocd repo add <저장소 주소> --username <계정명> --password <암호>
argocd repo add https://github.com/hyungwook0221/spring-boot-debug-app --username <계정명> --password <암호>

# 등록 확인 : 기본적으로 아르고시디가 설치된 쿠버네티스 클러스터는 타깃 클러스터로 등록됨
argocd repo list
TYPE  NAME  REPO                                                    INSECURE  OCI    LFS    CREDS  STATUS      MESSAGE  PROJECT
git         https://github.com/hyungwook0221/argo-demo.git          false     false  false  true   Successful
git         https://github.com/hyungwook0221/spring-boot-debug-app  false     false  false  true   Successful
(2) Helm Chart에 포함된 시크릿 데이터 배포
- Applicaton YAML 샘플
apiVersion: argoproj.io/v1alpha1
kind: Application
metadata:
  name: demo
  namespace: argocd
spec:
  destination:
    namespace: argocd
    server: https://kubernetes.default.svc
  project: default
  source:
    path: infra/helm
    repoURL: https://github.com/hyungwook0221/spring-boot-debug-app
    targetRevision: main
    plugin:
      env:
        - name: HELM_ARGS
          value: '-f override-values.yaml'
  syncPolicy:
    automated:
      prune: true
      selfHeal: true
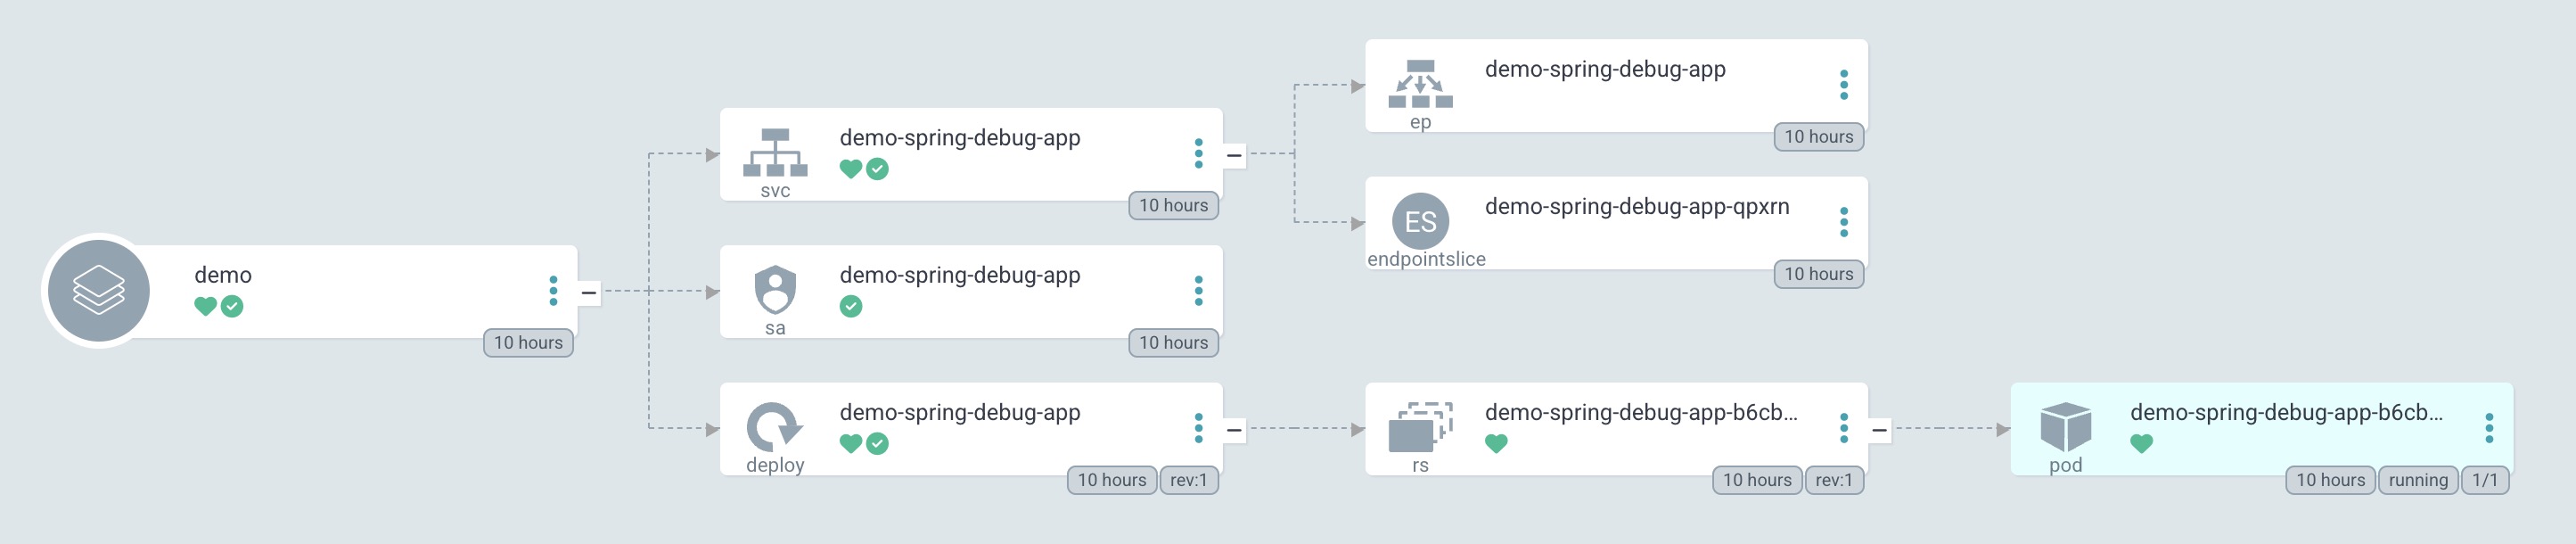
- 배포된 아키텍처
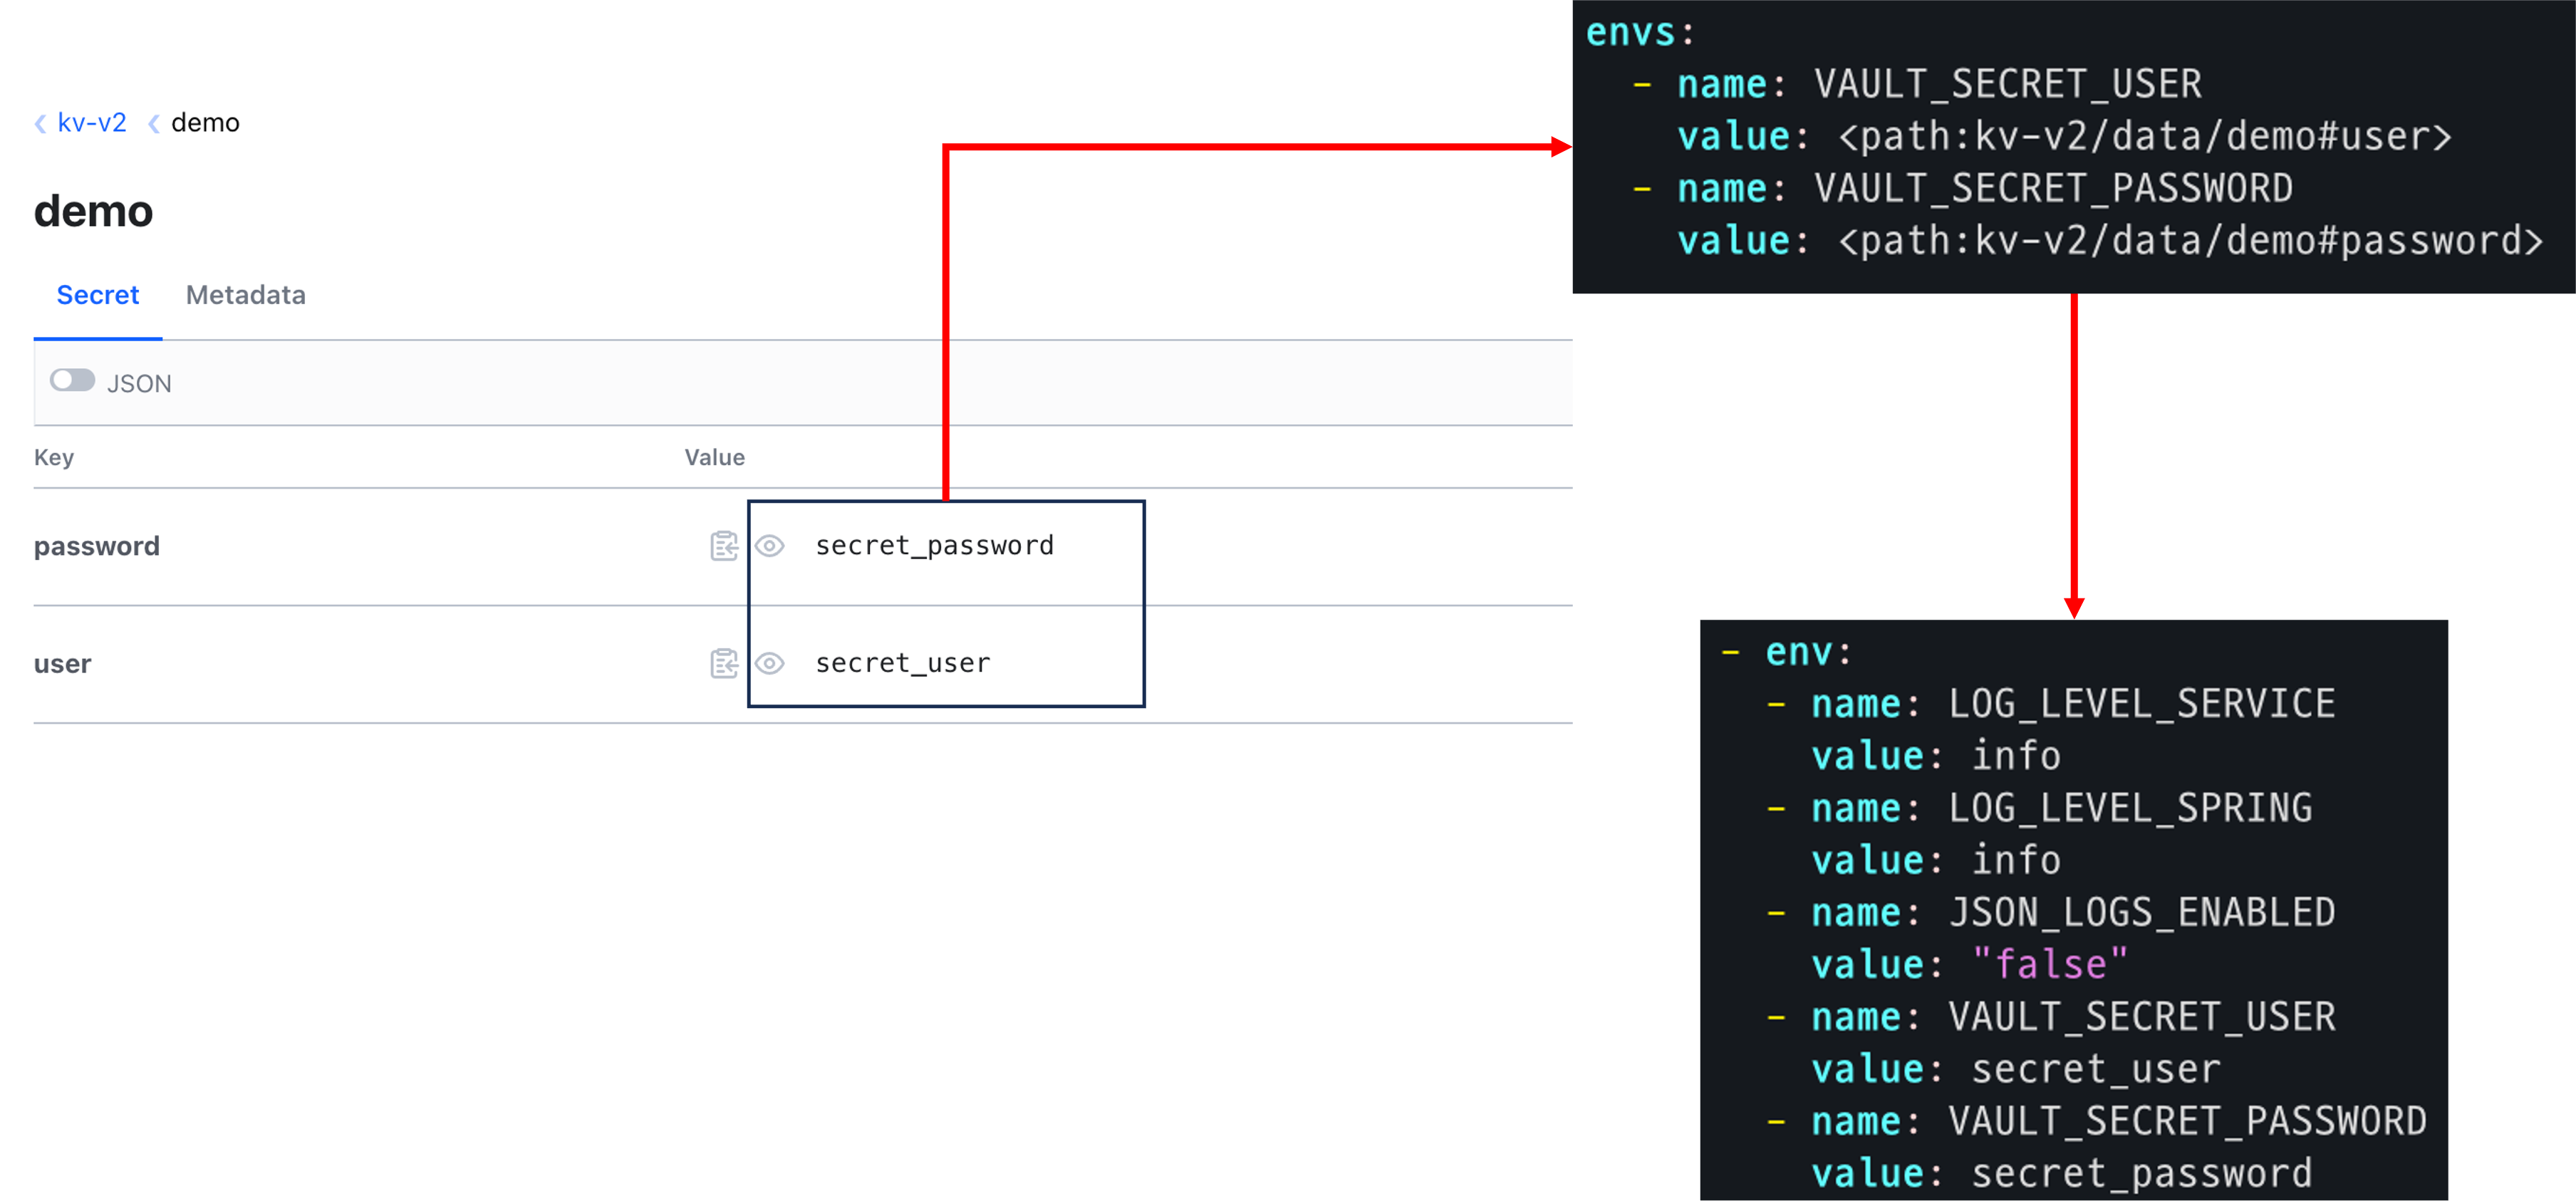
위 Application 배포시 사용될 override-values.yaml 파일의 코드 중 Vault를 통해서 받아올 부분은 다음과 같습니다.
#(생략)
envs:
  - name: VAULT_SECRET_USER
    value: <path:kv-v2/data/demo#user>
  - name: VAULT_SECRET_PASSWORD
    value: <path:kv-v2/data/demo#password>
해당 Values 파일에 등록된 VAULT_SECRET_USER, VAULT_SECRET_PASSWORD 값은 Vault의 KV-V2에 저장된 값을 호출하여 실제 매니페스트로 저장되어 배포될 때에는 다음과 같이 파싱된 후 기입됩니다.
이 외에 추가 데모 시나리오는 다음 글에서 이어서 업로드 하겠습니다!🔥